![[Spring] MyBatis를 이용한 Oracle 데이터베이스 CRUD 기능 사용](https://img1.daumcdn.net/thumb/R750x0/?scode=mtistory2&fname=https%3A%2F%2Fblog.kakaocdn.net%2Fdn%2FbPHFpW%2Fbtr5dAWzaMY%2F0nSzNARyAADKMjJTkGINiK%2Fimg.jpg)
Chapter#01 : [Spring] STS 개발환경 - 다운로드 및 작업 경로 지정
Chapter#02 : [Spring] STS 개발환경 - IDE 환경 설정
Chapter#03 : [Spring] Spring Framework 웹 프로젝트 만들기
Chapter#04 : [Spring] Spring MVC 패턴( Model2 아키텍쳐 ) 구현 하기
Chapter#05 : [Spring] Component-Scan을 사용하는 Annotation 기반 설정
Chapter#06 : [Spring] MyBatis를 이용한 Oracle 데이터베이스 CRUD 기능 사용
Chapter#07 : [Spring] log4j2 라이브러리를 사용한 로그 출력하기( 작성예정 35번 )
#01. 공통 컴포넌트
1) 공통 컴포넌트의 개념
· 물리적이고 대체 가능한 시스템의 부분으로써 제공하는 일련의 인터페이스를 준수하는 구현 패키지다.
· 인터페이스를 통해서 서비스를 제공하는 소프트웨어 패키지다.
· 특별한 기능을 수행하고 미리 구현되고, 미리 테스트된 독립적이고, 재사용 가능한 소프트웨어 단위이다.

컴포넌트는 하나 또는 여러개의 클래스로 구현될 수 있다.
스프링 프레임워크에서 제공하는 공통 컴포넌트의 아키텍처를 알아보자.
레이어는 프레젠테이션 레이어( Presentation Layer ), 비즈니스 레이어( Business Layer ), 인티그레이션 레이어( Integration Layer ), 데이터 엑세스 레이어( Data Access Layer )러 구성된다.

· 프레젠테이션 레이어는 DispatcherServlet과 Controller, JSP 등으로 구성된다.
· 비즈니스 레이어는 Service 인터페이스와 ServiceImpl 클래스 등으로 구성된다.
· 데이터 액세스 레이어는 DAO 클래스로 구성되어 있으며,
각 레이어 간에 전송되는 VO 클래스는 레이어의 중앙에 위치한다.
개발 프레임워크 기반 공통 서비스는 개발 프레임워크의 개발 환경을 고려해
모델( View ), 뷰( View ), 컨틀럴러( Controller )를 분리해서 개발되었다.
또한 데이터 처리 계층 및 SQL의 분리를 통해서 데이터베이스 변동에 유연하게 대응할 수 있게 설계되었다.
2) 공통 컴포넌트 구성
이제 공통 컴포넌트에서 제공하는 클래스들의 클래스 다이어그램과 시퀀스 다이어그램을 살펴보자.
UML( Unified Modeling Language )로 작성된 클래스 다이어그램에서는 클래스들의 포함 관계, 상속 관계, 의존 관계 등을 확인 할 수 있다.
UML 클래스 다이어그램에서 연관관계( association )는 한 클래스가 다른 클래스를 멤버 변수로 포함하는 포함 관계를 의미하고,
의존 관계( dependency )는 함수 호출 관계를 의미한다. implements는 클래스가 인터페이스를 구현하는 관계를 나타낸다.

다은은 UML 시퀀스 다이어그램을 나타낸다. 맨 위에 있는 사각형 박스는 객체를 의미한다.
화살표는 메시지 혹은 함수 호출을 의미한다.
User는 맨 처음 DiapatcherServlet 클래스 요청을 보낸다.
이는 FrontController로 동작함을 보여준다.
시퀀스 다이어그램을 통해서 시간의 흐름에 따른 객체의 상호작용을 확인할 수 있다.
즉 어떤 객체가 어떤 요청에 대해 어떤 함수를 어떤 순서로 호출하는지를 알 수 있다.

공통 컴포넌트를 적용함으로써 표준을 준수하고 유연성을 확보하며 재사용성이 극대화된다는 장점이 있다.
#2. Oracle 실습용 Table 및 Data 만들기
1) 게시판 샘플 테이블 생성 및 초기값 설정
-- ① 게시글 테이블 생성
CREATE TABLE EXAMPLE_BOARD (
	  EXAMPLE_NUMBER CHAR(10) NOT NULL
	, EXAMPLE_ID VARCHAR2(20) NOT NULL
	, EXAMPLE_NAME VARCHAR2(30) NOT NULL
	, EXAMPLE_TITLE VARCHAR2(100) NOT NULL
	, EXAMPLE_INFO CLOB NULL
	, EXAMPLE_DATE DATE DEFAULT CURRENT_TIMESTAMP
	, PRIMARY KEY(EXAMPLE_NUMBER)
);

-- ② 게시글 테이블 컬럼 설명
COMMENT ON COLUMN EXAMPLE_BOARD.EXAMPLE_NUMBER IS '테이블 ID';
COMMENT ON COLUMN EXAMPLE_BOARD.EXAMPLE_ID IS '작성자 ID';
COMMENT ON COLUMN EXAMPLE_BOARD.EXAMPLE_NAME IS '작성자 이름';
COMMENT ON COLUMN EXAMPLE_BOARD.EXAMPLE_TITLE IS '게시글 제목';
COMMENT ON COLUMN EXAMPLE_BOARD.EXAMPLE_INFO IS '게시글 내용';
COMMENT ON COLUMN EXAMPLE_BOARD.EXAMPLE_DATE IS '시간';

-- ③ 게시글 초기 데이터 INSERT
INSERT INTO EXAMPLE_BOARD(EXAMPLE_NUMBER, EXAMPLE_ID, EXAMPLE_NAME, EXAMPLE_TITLE, EXAMPLE_INFO, EXAMPLE_DATE) VALUES
('EX00000001', 'captain', '캡틴 아메리카', 'First Avenger', '캡틴 아메리카의 ''캡틴''은 초창기 코믹스에서는 말 그대로 미국의 대장이라는 뉘앙스로 쓰였으나,<br/>시간이 흘러 캡틴이라는 말에는 어벤져스의 넘버 원이라는 의미도 포함되었다.', '2011-07-28');
INSERT INTO EXAMPLE_BOARD (EXAMPLE_NUMBER, EXAMPLE_ID, EXAMPLE_NAME, EXAMPLE_TITLE, EXAMPLE_INFO, EXAMPLE_DATE) VALUES
('EX00000002', 'ironman', '아이언 맨', 'I Am Iron Man', '억만장자 천재 발명가인 토니 스타크가 심장에 치명적인 상처를 입은 자신의 목숨을 지키며<br/>동시에 세계를 지킬 강화 슈트를 제작하고 과학의 결정체로 만들어진 슈트를 입고<br/>아이언맨이 되어 범죄와 싸워나간다.', '2008-04-30');
INSERT INTO EXAMPLE_BOARD(EXAMPLE_NUMBER, EXAMPLE_ID, EXAMPLE_NAME, EXAMPLE_TITLE, EXAMPLE_INFO, EXAMPLE_DATE) VALUES
('EX00000003', 'thor', '토르', 'God of Thunder', '지구를 비롯한 아홉 왕국의 평화와 생명을 수호하는 천둥의 신.<br/>올 파더 오딘과 프리가의 맏아들이다. ', '2011-04-28');

COMMIT;
먼저 EXAMPLE_BOARD 라는 신규 테이블 생성하고, 초기데이터를 추가하여준다.
2) ID Generation 설정
-- ① 아이디 제너레이션 테이블 생성
CREATE TABLE ID_GENERATION (
	  TABLE_NAME VARCHAR2(30) PRIMARY KEY
	, NEXT_ID NUMBER(11) NOT NULL
);

-- ② 아이디 제너레이션 테이블 컬럼 설명
COMMENT ON COLUMN ID_GENERATION.TABLE_NAME IS '테이블 이름';
COMMENT ON COLUMN ID_GENERATION.NEXT_ID IS '증가할 ID값';

-- ③ 아이디 제너레이션 초기값 INSERT
-- 샘플 데이터가 초기데이터를 3개 넣어두었기 때문에 NEXT_ID의 값은 4로 설정한다.
-- 초기 데이터가 없는경우에는 NEXT_ID의 값을 1로 설정하여 사용하면 된다.
INSERT INTO ID_GENERATION(TABLE_NAME, NEXT_ID) VALUES('EXAMPLE_BOARD', '4');

COMMIT;
테이블에 데이터를 INSERT시 해당 ROW 데이터의 구분을 위한 유니크한 값이 필요하다.
Oracle 시퀀스등을 이용하여 숫자 값을 '+1'씩 증가시키는 형태로 사용할 수 있지만
해당 포스팅에서는 전자정부의 표준 프레임워크에서 지원하는 ID Generation 설정을 사용한다.
#2. Maven Dependencies에 라이브러리 추가하기
1) Spring JDBC, Spring Transaction 라이브러리 추가
SpringJDBC
Spring JDBC는 JAVA 언어에서 데이터베이스에 접근할 수 있는 API인 JDBC( Java Database Connectivity )를 Spring Framework에서 쉽게 사용할 수 있도록 지원하는 라이브러리이다.
Spring JDBC는 JDBC를 이용하여 데이터베이스에 쿼리를 실행하고, 결과를 매핑하는 등의 작업을 단순화하고, 일관성 있는 예외 처리와 자원 관리를 제공한다.
Spring Transaction
Spring Transaction은 Spring Framework에서 제공하는 트랜잭션 처리를 위한 라이브러리이다.
Spring Transaction은 JDBC, JPA, Hibernate 등 다양한 데이터 액세스 기술과 함께 사용할 수 있으며, 트랜잭션 처리를 위한 여러가지 방법을 제공합니다. Spring Transaction은 AOP(Aspect Oriented Programming)을 이용하여 트랜잭션 처리를 구현하며, 프로그래머가 복잡한 트랜잭션 처리 코드를 작성하지 않아도 됩니다. 또한, Spring Transaction은 트랜잭션 관리를 위한 여러가지 옵션을 제공하며, 분산 환경에서의 트랜잭션 처리를 위한 기능도 제공한다.
Spring JDBC와 Spring Transaction은 모두 Spring Framework에서 제공하는 핵심 라이브러리 중 하나이다.
이 라이브러리들을 이용하면 JAVA 언어에서 Data Access 및 Transaction 처리를 보다 쉽고 간편하게 할 수 있습니다.
pom.xml 파일을 열고 Spring-jdbc, Spring-tx 파일을 추가한다.

pom.xml
<?xml version="1.0" encoding="UTF-8"?>
<project xmlns="http://maven.apache.org/POM/4.0.0" xmlns:xsi="http://www.w3.org/2001/XMLSchema-instance"
  xsi:schemaLocation="http://maven.apache.org/POM/4.0.0 http://maven.apache.org/xsd/maven-4.0.0.xsd">
  <modelVersion>4.0.0</modelVersion>

  <groupId>com.spring</groupId>
  <artifactId>spring_web</artifactId>
  <version>0.0.1-SNAPSHOT</version>
  <packaging>war</packaging>

  <name>spring_web Maven Webapp</name>
  <!-- FIXME change it to the project's website -->
  <url>http://www.example.com</url>

  <properties>
    <project.build.sourceEncoding>UTF-8</project.build.sourceEncoding>
    <maven.compiler.source>1.8</maven.compiler.source>
    <maven.compiler.target>1.8</maven.compiler.target>

    <org.springframework-version>5.2.3.RELEASE</org.springframework-version>
  </properties>

  <dependencies>

  ~~ 이 하 생 략 ~~

	<dependency>
      <groupId>org.springframework</groupId>
      <artifactId>spring-jdbc</artifactId>
      <version>${org.springframework-version}</version>
    </dependency>

        <dependency>
      <groupId>org.springframework</groupId>
      <artifactId>spring-tx</artifactId>
      <version>${org.springframework-version}</version>
    </dependency>

  </dependencies>

  ~~ 이 하 생 략 ~~

</project>
Maven 디펜던시에 Spring-jdbc, Spring-tx를 추가되었으면
pom.xml 파일을 우클릭하고 Run As → Maven build 한다.

BUILD SUCCESS 문구가 출력되면 Maven Dependencies에 Spring-jdbc, Spring-tx 라이브러리가 추가되어 있다.
2) Oracle - ojdbc6 라이브러리 추가
Oracle ojdbc버전.jar은 Oracle 데이터베이스에 연결하고 데이터베이스 액세스를 위한 JDBC 드라이브이다.
JDBC( Java Database Connectivity )는 자바 프로그램에서 데이터베이스에 접속하여 데이터를 읽거나 쓰기 위한 자바 API이며,
이를 이용하여 Oracle 데이터베이스와 연동할 수 있다.
먼저 아래 ojdbc6.jar 파일을 다운받는다.
프로젝트의 src/main/webapp/WEB-INF 경로에 library 디렉토리를 새로 생성한다.

New Folder에서 Folder name을 library로 지정하고 Finish 버튼을 클릭한다.

library 폴더가 생성되면 다운받은 ojdbc6.jar 파일을 복사 + 붙여 넣기 하여준다.

pom.xml 파일을 열고 ojdbc6를 Maven dependency에 추가한다.

pom.xml
<?xml version="1.0" encoding="UTF-8"?>
<project xmlns="http://maven.apache.org/POM/4.0.0" xmlns:xsi="http://www.w3.org/2001/XMLSchema-instance"
  xsi:schemaLocation="http://maven.apache.org/POM/4.0.0 http://maven.apache.org/xsd/maven-4.0.0.xsd">
  <modelVersion>4.0.0</modelVersion>

  <groupId>com.spring</groupId>
  <artifactId>spring_web</artifactId>
  <version>0.0.1-SNAPSHOT</version>
  <packaging>war</packaging>

  <name>spring_web Maven Webapp</name>
  <!-- FIXME change it to the project's website -->
  <url>http://www.example.com</url>

  <properties>
    <project.build.sourceEncoding>UTF-8</project.build.sourceEncoding>
    <maven.compiler.source>1.8</maven.compiler.source>
    <maven.compiler.target>1.8</maven.compiler.target>

    <org.springframework-version>5.2.3.RELEASE</org.springframework-version>
  </properties>

  <dependencies>

  ~~ 이 하 생 략 ~~

	<dependency>
      <groupId>com.oracle</groupId>
      <artifactId>ojdbc6</artifactId>
      <version>11.2.0.3</version>
      <scope>system</scope>
      <systemPath>
      	${basedir}/src/main/webapp/WEB-INF/library/ojdbc6.jar
      </systemPath>
	</dependency>

  </dependencies>

  ~~ 이 하 생 략 ~~

</project>
이때 <systemPath>를 사용하여 강제적으로
${basedir}/src/main/webapp/WEB-INF/ibrary₩ojdbc6.jar 경로로 맞추어 주어야 한다.

BUILD SUCCESS 문구가 출력되면 Maven Dependencies에 ojdbc6.jar 라이브러리가 추가되어 있다.
JDK 8 버전에서는 Oracle JDBC 드라이버를 Maven 중앙 저장소에서 직접 다운로드할 수 없기 때문에,
시스템 경로를 사용하여 드라이버 파일을 로컬 시스템에 설치하고 Maven 프로젝트의 classpath에 추가해야 한다.
이를 위해 Maven은 systemPath를 사용하여 직접 경로를 잡아줄 수밖에 없다.
그러나 systemPath를 사용할 때는 로컬 파일 시스템의 경로가 변경될 수 있기 때문에,
이를 고려하여 빌드 및 배포 프로세스를 관리해야한다.
따라서 systemPath는 가능한 한 사용하지 않는 것이 좋다.
Apache Maven의 repository를 열고 <group id>에 맞춰 com\oralce\ojdbc6\버전정보 디렉토리를 열어보면

위 이미지와 동일한지 확인해 보자.
동일하다면 다음 작업을 계속 진행한다.
위에서 우리가 생성한 library 폴더와 ojdbc6.jar 파일을 삭제한다.

spring_프로젝트₩target₩spring_프로젝트₩WEB-INF₩lib 디렉토리를 오픈하고
위에서 우리가 다운받은 ojdbc6.jar 파일을 복사 붙여넣기 한다.

다시 pom.xml 파일을 열고 ojdbc 디펜던시 설정에서 <scope>, <systemPath>의 속성을 삭제한다.

pom.xml
<?xml version="1.0" encoding="UTF-8"?>
<project xmlns="http://maven.apache.org/POM/4.0.0" xmlns:xsi="http://www.w3.org/2001/XMLSchema-instance"
  xsi:schemaLocation="http://maven.apache.org/POM/4.0.0 http://maven.apache.org/xsd/maven-4.0.0.xsd">
  <modelVersion>4.0.0</modelVersion>

  <groupId>com.spring</groupId>
  <artifactId>spring_web</artifactId>
  <version>0.0.1-SNAPSHOT</version>
  <packaging>war</packaging>

  <name>spring_web Maven Webapp</name>
  <!-- FIXME change it to the project's website -->
  <url>http://www.example.com</url>

  <properties>
    <project.build.sourceEncoding>UTF-8</project.build.sourceEncoding>
    <maven.compiler.source>1.8</maven.compiler.source>
    <maven.compiler.target>1.8</maven.compiler.target>

    <org.springframework-version>5.2.3.RELEASE</org.springframework-version>
  </properties>

  <dependencies>

  ~~ 이 하 생 략 ~~

	<dependency>
      <groupId>com.oracle</groupId>
      <artifactId>ojdbc6</artifactId>
      <version>11.2.0.3</version>
	</dependency>

  </dependencies>

  ~~ 이 하 생 략 ~~

</project>
<scope><systemPath>를 삭제하고 pom.xml 파일을 우클릭하고 Run As → Maven build 한다.

3) commons-dbcp, commons-pool 라이브러리 추가
commons-dbcp와 commons-pool은 자바 애플리케이션에서 데이터베이스 연결을 관리하기 위해 함께 자주 사용되는 두 개의 Apache Commons 라이브러리이다.
commons-dbcp와 commons-pool을 함께 사용하면 자바 애플리케이션에서 데이터베이스 연결을 효율적으로 관리할 수 있다.
commons-dbcp는 내부적으로 commons-pool을 사용하여 연결 풀을 구현하므로 개발자는 풀을 튜닝하여 애플리케이션의 특정 요구 사항을 충족시킬 수 있습니다.
pom.xml을 열고 commons-dbcp와 commons-pool을 Maven dependency에 추가한다.

pom.xml
<?xml version="1.0" encoding="UTF-8"?>
<project xmlns="http://maven.apache.org/POM/4.0.0" xmlns:xsi="http://www.w3.org/2001/XMLSchema-instance"
  xsi:schemaLocation="http://maven.apache.org/POM/4.0.0 http://maven.apache.org/xsd/maven-4.0.0.xsd">
  <modelVersion>4.0.0</modelVersion>

  <groupId>com.spring</groupId>
  <artifactId>spring_web</artifactId>
  <version>0.0.1-SNAPSHOT</version>
  <packaging>war</packaging>

  <name>spring_web Maven Webapp</name>
  <!-- FIXME change it to the project's website -->
  <url>http://www.example.com</url>

  <properties>
    <project.build.sourceEncoding>UTF-8</project.build.sourceEncoding>
    <maven.compiler.source>1.8</maven.compiler.source>
    <maven.compiler.target>1.8</maven.compiler.target>

    <org.springframework-version>5.2.3.RELEASE</org.springframework-version>
  </properties>

  <dependencies>

  ~~ 이 하 생 략 ~~

	<dependency>
      <groupId>commons-dbcp</groupId>
      <artifactId>commons-dbcp</artifactId>
      <version>1.4</version>
	</dependency>

	<dependency>
      <groupId>commons-pool</groupId>
      <artifactId>commons-pool</artifactId>
      <version>1.6</version>
	</dependency>

  </dependencies>

  ~~ 이 하 생 략 ~~

</project>
pom.xml 파일을 우클릭하고 Run As → Maven build 한다.

BUILD SUCCESS 문구가 출력되면 Maven Dependencies에
commons-dbcp.jar와 commons-pool.jar 라이브러리가 추가되어 있다.
4) MyBatis 라이브러리 추가
MyBatis를 사용하기 위해서는 먼저 MyBatis Core 라이브러리( mybatis.jar )와
MyBatis Spring 연동 라이브러리( mybatis-spring.jar )를 추가해야 합니다.
MyBatis Core 라이브러리( mybatis.jar )
MyBatis에서 가장 중요한 역할을 담당하는 라이브러리로, SQL 매핑 파일(XML 또는 애노테이션)을 통해 데이터베이스 연동을 처리한다.
MyBatis Core 라이브러리는 JDBC 드라이버를 직접 사용하여 데이터베이스에 접속합니다.
MyBatis Spring 연동 라이브러리( mybatis-spring.jar )
Spring 프레임워크와 MyBatis를 연동하기 위한 라이브러리이다.
MyBatis-Spring 라이브러리는 Spring 프레임워크의 IoC(Inversion of Control) 기능과 트랜잭션 관리 기능을 MyBatis와 통합하여 사용할 수 있도록 지원한다.
이를 통해 MyBatis를 보다 쉽게 Spring 프레임워크와 연동하여 사용할 수 있다.
pom.xml을 열고 mybatis와 mybatis-spring을 Maven dependency에 추가한다.

pom.xml
<?xml version="1.0" encoding="UTF-8"?>
<project xmlns="http://maven.apache.org/POM/4.0.0" xmlns:xsi="http://www.w3.org/2001/XMLSchema-instance"
  xsi:schemaLocation="http://maven.apache.org/POM/4.0.0 http://maven.apache.org/xsd/maven-4.0.0.xsd">
  <modelVersion>4.0.0</modelVersion>

  <groupId>com.spring</groupId>
  <artifactId>spring_web</artifactId>
  <version>0.0.1-SNAPSHOT</version>
  <packaging>war</packaging>

  <name>spring_web Maven Webapp</name>
  <!-- FIXME change it to the project's website -->
  <url>http://www.example.com</url>

  <properties>
    <project.build.sourceEncoding>UTF-8</project.build.sourceEncoding>
    <maven.compiler.source>1.8</maven.compiler.source>
    <maven.compiler.target>1.8</maven.compiler.target>

    <org.springframework-version>5.2.3.RELEASE</org.springframework-version>
  </properties>

  <dependencies>

  ~~ 이 하 생 략 ~~

	<dependency>
      <groupId>org.mybatis</groupId>
      <artifactId>mybatis</artifactId>
      <version>3.5.6</version>
	</dependency>

	<dependency>
      <groupId>org.mybatis</groupId>
      <artifactId>mybatis-spring</artifactId>
      <version>2.0.6</version>
	</dependency>

  </dependencies>

  ~~ 이 하 생 략 ~~

</project>
pom.xml 파일을 우클릭하고 Run As → Maven build 한다.

BUILD SUCCESS 문구가 출력되면 Maven Dependencies에
mybatis.jar와 mybatis-spring.jar 라이브러리가 추가되어 있다.
5) idGen- eGovFrame 라이브러리 추가
( 전자정부 표준 프레임워크 Id Generation 라이브러리 추가 )
Oralce DB에서는 테이블에 생성시 번호로 정렬할 수 있는 시퀀스( Sequence )를 생성하는 방법으로
Oralce Sequence를 사용하는 방법이 있지만,
해당 포스팅에서는 전자 정부 표준 프레임워크에서 제공하는 아이디 제너레이션 설정을 사용하려 한다.
① 표준프레임워크 - 공통기반 레이어 3.10.0 다운로드
실행환경 - 3.x 다운로드 | 표준프레임워크 포털 eGovFrame
처리중입니다. 잠시만 기다려주십시오.
www.egovframe.go.kr

② 표준프레임워크 - 데이터처리 레이어 3.10.0 다운로드
실행환경 - 3.x 다운로드 | 표준프레임워크 포털 eGovFrame
처리중입니다. 잠시만 기다려주십시오.
www.egovframe.go.kr

파일 다운로드가 완료되면 pom.xml 파일을 열고 아래 라이브러리를 Maven dependency에 추가한다.
① egovframework.rte.fdl.cmmn 라이브러리
② egovframework.rte.fdl.idgnr 라이브러리
③ egovframework.rte.psl.dataaccess 라이브러리

pom.xml
<?xml version="1.0" encoding="UTF-8"?>
<project xmlns="http://maven.apache.org/POM/4.0.0" xmlns:xsi="http://www.w3.org/2001/XMLSchema-instance"
  xsi:schemaLocation="http://maven.apache.org/POM/4.0.0 http://maven.apache.org/xsd/maven-4.0.0.xsd">
  <modelVersion>4.0.0</modelVersion>

  <groupId>com.spring</groupId>
  <artifactId>spring_web</artifactId>
  <version>0.0.1-SNAPSHOT</version>
  <packaging>war</packaging>

  <name>spring_web Maven Webapp</name>
  <!-- FIXME change it to the project's website -->
  <url>http://www.example.com</url>

  <properties>
    <project.build.sourceEncoding>UTF-8</project.build.sourceEncoding>
    <maven.compiler.source>1.8</maven.compiler.source>
    <maven.compiler.target>1.8</maven.compiler.target>

    <org.springframework-version>5.2.3.RELEASE</org.springframework-version>
  </properties>

  <dependencies>

  ~~ 이 하 생 략 ~~

    <dependency>
      <groupId>egovframework.rte</groupId>
      <artifactId>egovframework.rte.fdl.cmmn</artifactId>
      <version>3.10.0</version>
    </dependency>

    <dependency>
      <groupId>egovframework.rte</groupId>
      <artifactId>egovframework.rte.fdl.idgnr</artifactId>
      <version>3.10.0</version>
    </dependency>

    <dependency>
      <groupId>egovframework.rte</groupId>
      <artifactId>egovframework.rte.psl.dataaccess</artifactId>
      <version>3.10.0</version>
    </dependency>

  </dependencies>

  ~~ 이 하 생 략 ~~

</project>
위와 같이 pom.xml에 Maven dependency 내용을 추가한 이후에

Apache Maven의 repository에 egovframework₩rte 경로를 확인하면
① egovframework.rte.fdl.cmmn
② egovframework.rte.fdl.idgnr
③ egovframework.rte.psl.dataacces
3개의 폴더가 생성되어 있을 것이다.
위에서 다운받은 공통기반_레이어.zip, 데이터처리_레이어.zip 파일들의 압축을 해제하고
각각 경로에 맞는 *.jar 파일을 위치시킨다.
① egovframework.rte.fdl.cmmn-버전.jar 배치하기

공통기반_버전.zip 파일에서 egovframework.rte.fdl.cmmn-버전.jar 파일을 찾고 위치시킨다.
② egovframework.rte.fdl.idgnr-버전.jar 배치하기

공통기반_버전.zip 파일에서 egovframework.rte.fdl.idgnr-버전.jar 파일을 찾고 위치시킨다.
③ egovframework.rte.psl.dataaccess-버전.jar 배치하기

데이터처리_버전.zip 파일에서 egovframework.rte.psl.dataacces-버전.jar 파일을 찾고 위치시킨다.
다시 STS로 돌아와 pom.xml을 우클릭하고 Run As → Maven build 해준다.

BUILD SUCCESS 문구가 출력되면 Maven Dependencies에 egovframework 라이브러리들이 추가되어있다.
5) slf4j 라이브러리 추가
SLF4J는 Simple Logging Facade for Java의 약자로, 자바 프로그램에서 로깅 기능을 쉽게 구현하고,
로깅 시스템의 변경 용이성과 높은 성능을 제공하여 개발자의 편의성을 높여준다.
pom.xml을 열고 slf4j를 Maven dependency에 추가한다.

pom.xml
<?xml version="1.0" encoding="UTF-8"?>
<project xmlns="http://maven.apache.org/POM/4.0.0" xmlns:xsi="http://www.w3.org/2001/XMLSchema-instance"
  xsi:schemaLocation="http://maven.apache.org/POM/4.0.0 http://maven.apache.org/xsd/maven-4.0.0.xsd">
  <modelVersion>4.0.0</modelVersion>

  <groupId>com.spring</groupId>
  <artifactId>spring_web</artifactId>
  <version>0.0.1-SNAPSHOT</version>
  <packaging>war</packaging>

  <name>spring_web Maven Webapp</name>
  <!-- FIXME change it to the project's website -->
  <url>http://www.example.com</url>

  <properties>
    <project.build.sourceEncoding>UTF-8</project.build.sourceEncoding>
    <maven.compiler.source>1.8</maven.compiler.source>
    <maven.compiler.target>1.8</maven.compiler.target>

    <org.springframework-version>5.2.3.RELEASE</org.springframework-version>
  </properties>

  <dependencies>

  ~~ 이 하 생 략 ~~

    <dependency>
      <groupId>org.slf4j</groupId>
      <artifactId>slf4j-api</artifactId>
      <version>1.7.30</version>
    </dependency>

  </dependencies>

  ~~ 이 하 생 략 ~~

</project>
pom.xml 파일을 우클릭하고 Run As → Maven build 한다.

BUILD SUCCESS 문구가 출력되면 Maven Dependencies에 slf4j.jar 라이브러리가 추가되어 있다.
6) Jackson 라이브러리 추가
Jackson은 Java 객체를 JSON으로 변환하거나 JSON을 Java 객체로 변환하는 라이브러리이다.
Ajax 통신을 이용하여 JSON 데이터를 Request, Response 하기위해 Jackson 라이브러리를 추가한다.
Jackson은 자바 직렬화와 같은 다른 형식보다 더 효율적이며, RESTful 웹 서비스와 같은 환경에서 자주 사용된다.
jackson-core
Jackson 라이브러리의 핵심 기능, JSON 파싱, 생성, 수정 등의 역할을 수행한다.
jackson-annotations
Jackson 라이브러리에서 사용되는 어노테이션을 제공한다.
@JsonSerialize, @JsonDeserialize, @JsonIgnore 등의 어노테이션을 사용하여 JSON 변환 시 객체의 특정 속성을 제어
jackson-databind
jackson-databind 모듈은 Jackson 라이브러리에서 가장 많이 사용되는 모듈이다.
jackson-core와 jackson-annotations 모듈을 기반으로하여, 자바 객체와 JSON 데이터 간의 매핑을 처리한다.
즉, 자바 객체를 JSON으로 변환하거나, JSON 데이터를 자바 객체로 변환하는 기능을 수행한다.
Maven Dependecy에 jackson-core, jackson-annotations, jackson-databind 라이브러리를 추가한다.

pom.xml
<?xml version="1.0" encoding="UTF-8"?>
<project xmlns="http://maven.apache.org/POM/4.0.0" xmlns:xsi="http://www.w3.org/2001/XMLSchema-instance"
  xsi:schemaLocation="http://maven.apache.org/POM/4.0.0 http://maven.apache.org/xsd/maven-4.0.0.xsd">
  <modelVersion>4.0.0</modelVersion>

  <groupId>com.spring</groupId>
  <artifactId>spring_web</artifactId>
  <version>0.0.1-SNAPSHOT</version>
  <packaging>war</packaging>

  <name>spring_web Maven Webapp</name>
  <!-- FIXME change it to the project's website -->
  <url>http://www.example.com</url>

  <properties>
    <project.build.sourceEncoding>UTF-8</project.build.sourceEncoding>
    <maven.compiler.source>1.8</maven.compiler.source>
    <maven.compiler.target>1.8</maven.compiler.target>

    <org.springframework-version>5.2.3.RELEASE</org.springframework-version>
  </properties>

  <dependencies>

  ~~ 이 하 생 략 ~~

    <dependency>
      <groupId>com.fasterxml.jackson.core</groupId>
      <artifactId>jackson-core</artifactId>
      <version>2.12.3</version>
    </dependency>

    <dependency>
      <groupId>com.fasterxml.jackson.core</groupId>
      <artifactId>jackson-annotations</artifactId>
      <version>2.12.3</version>
    </dependency>

    <dependency>
      <groupId>com.fasterxml.jackson.core</groupId>
      <artifactId>jackson-databind</artifactId>
      <version>2.12.3</version>
    </dependency>

  </dependencies>

  ~~ 이 하 생 략 ~~

</project>
pom.xml 파일을 우클릭하고 Run As → Maven build 한다.

BUILD SUCCESS 문구가 출력되면 Maven Dependencies에 jackson 라이브러리가 추가되어 있다.
pom.xml
<?xml version="1.0" encoding="UTF-8"?>

<project xmlns="http://maven.apache.org/POM/4.0.0" xmlns:xsi="http://www.w3.org/2001/XMLSchema-instance"
  xsi:schemaLocation="http://maven.apache.org/POM/4.0.0 http://maven.apache.org/xsd/maven-4.0.0.xsd">
  <modelVersion>4.0.0</modelVersion>

  <groupId>com.spring</groupId>
  <artifactId>spring_web</artifactId>
  <version>0.0.1-SNAPSHOT</version>
  <packaging>war</packaging>

  <name>spring_web Maven Webapp</name>
  <!-- FIXME change it to the project's website -->
  <url>http://www.example.com</url>

  <properties>
    <project.build.sourceEncoding>UTF-8</project.build.sourceEncoding>
    <maven.compiler.source>1.8</maven.compiler.source>
    <maven.compiler.target>1.8</maven.compiler.target>

    <org.springframework-version>5.2.3.RELEASE</org.springframework-version>
  </properties>

  <dependencies>
    <dependency>
      <groupId>junit</groupId>
      <artifactId>junit</artifactId>
      <version>4.11</version>
      <scope>test</scope>
    </dependency>

    <dependency>
      <groupId>org.springframework</groupId>
      <artifactId>spring-aop</artifactId>
      <version>${org.springframework-version}</version>
    </dependency>

    <dependency>
      <groupId>org.springframework</groupId>
      <artifactId>spring-beans</artifactId>
      <version>${org.springframework-version}</version>
    </dependency>

    <dependency>
      <groupId>org.springframework</groupId>
      <artifactId>spring-context</artifactId>
      <version>${org.springframework-version}</version>
    </dependency>

    <dependency>
      <groupId>org.springframework</groupId>
      <artifactId>spring-core</artifactId>
      <version>${org.springframework-version}</version>
    </dependency>

    <dependency>
      <groupId>org.springframework</groupId>
      <artifactId>spring-expression</artifactId>
      <version>${org.springframework-version}</version>
    </dependency>

    <dependency>
      <groupId>org.springframework</groupId>
      <artifactId>spring-jcl</artifactId>
      <version>${org.springframework-version}</version>
    </dependency>

    <dependency>
      <groupId>org.springframework</groupId>
      <artifactId>spring-web</artifactId>
      <version>${org.springframework-version}</version>
    </dependency>

    <dependency>
      <groupId>org.springframework</groupId>
      <artifactId>spring-webmvc</artifactId>
      <version>${org.springframework-version}</version>
    </dependency>

    <dependency>
      <groupId>org.springframework</groupId>
      <artifactId>spring-jdbc</artifactId>
      <version>${org.springframework-version}</version>
    </dependency>

	<dependency>
      <groupId>org.springframework</groupId>
      <artifactId>spring-tx</artifactId>
      <version>${org.springframework-version}</version>
    </dependency>

	<dependency>
      <groupId>com.oracle</groupId>
      <artifactId>ojdbc6</artifactId>
      <version>11.2.0.3</version>
	</dependency>

	<dependency>
      <groupId>commons-dbcp</groupId>
      <artifactId>commons-dbcp</artifactId>
      <version>1.4</version>
	</dependency>

	<dependency>
      <groupId>commons-pool</groupId>
      <artifactId>commons-pool</artifactId>
      <version>1.6</version>
	</dependency>

	<dependency>
      <groupId>org.mybatis</groupId>
      <artifactId>mybatis</artifactId>
      <version>3.5.6</version>
	</dependency>

	<dependency>
      <groupId>org.mybatis</groupId>
      <artifactId>mybatis-spring</artifactId>
      <version>2.0.6</version>
	</dependency>

	<dependency>
      <groupId>egovframework.rte</groupId>
      <artifactId>egovframework.rte.fdl.cmmn</artifactId>
      <version>3.10.0</version>
    </dependency>

    <dependency>
      <groupId>egovframework.rte</groupId>
      <artifactId>egovframework.rte.fdl.idgnr</artifactId>
      <version>3.10.0</version>
    </dependency>

    <dependency>
      <groupId>egovframework.rte</groupId>
      <artifactId>egovframework.rte.psl.dataaccess</artifactId>
      <version>3.10.0</version>
    </dependency>

    <dependency>
      <groupId>org.slf4j</groupId>
      <artifactId>slf4j-api</artifactId>
      <version>1.7.30</version>
    </dependency>

	<dependency>
      <groupId>javax.servlet</groupId>
      <artifactId>servlet-api</artifactId>
      <version>2.5</version>
      <scope>provided</scope>
    </dependency>

    <dependency>
      <groupId>javax.servlet</groupId>
      <artifactId>jstl</artifactId>
      <version>1.2</version>
    </dependency>

    <dependency>
      <groupId>com.fasterxml.jackson.core</groupId>
      <artifactId>jackson-core</artifactId>
      <version>2.12.3</version>
    </dependency>

    <dependency>
      <groupId>com.fasterxml.jackson.core</groupId>
      <artifactId>jackson-annotations</artifactId>
      <version>2.12.3</version>
    </dependency>

    <dependency>
      <groupId>com.fasterxml.jackson.core</groupId>
      <artifactId>jackson-databind</artifactId>
      <version>2.12.3</version>
    </dependency>

  </dependencies>

  <build>
    <finalName>spring_web</finalName>
    <pluginManagement><!-- lock down plugins versions to avoid using Maven defaults (may be moved to parent pom) -->
      <plugins>
        <plugin>
          <artifactId>maven-clean-plugin</artifactId>
          <version>3.1.0</version>
        </plugin>
        <!-- see http://maven.apache.org/ref/current/maven-core/default-bindings.html#Plugin_bindings_for_war_packaging -->
        <plugin>
          <artifactId>maven-resources-plugin</artifactId>
          <version>3.0.2</version>
        </plugin>
        <plugin>
          <artifactId>maven-compiler-plugin</artifactId>
          <version>3.8.0</version>
          <configuration>
            <source>1.8</source>
            <target>1.8</target>
            <encoding>UTF-8</encoding>
          </configuration>
        </plugin>
        <plugin>
          <artifactId>maven-surefire-plugin</artifactId>
          <version>2.22.1</version>
        </plugin>
        <plugin>
          <artifactId>maven-war-plugin</artifactId>
          <version>3.2.2</version>
        </plugin>
        <plugin>
          <artifactId>maven-install-plugin</artifactId>
          <version>2.5.2</version>
        </plugin>
        <plugin>
          <artifactId>maven-deploy-plugin</artifactId>
          <version>2.8.2</version>
        </plugin>
      </plugins>
    </pluginManagement>
  </build>
</project>
#3. DataBase Connection 설정하기
1) DataBase 접속정보를 가지는 properties 파일 생성하기
database.properties는 데이터베이스 연결 설정 정보를 포함하는 프로퍼티 파일이다.
보통 웹 애플리케이션에서는 데이터베이스 연결 정보를 소스 코드에 하드코딩하는 것은 권장되지 않기에 대신,
database.properties와 같은 외부 파일에 연결 정보를 저장하고 이 파일을 로드하여 연결 정보를 사용하는 것이 좋다.
프로젝트의 resource 디렉토리에서 마우스 우클릭하여 config 디렉토리를 생성한다

Select a wizard 창이 뜨면 Folder를 찾고 Next > 버튼을 클릭한다.

Folder name 입력란에 config 라고 입력한다.

Finish 버튼을 클릭하여 config 폴더를 생성한다.
생성된 config 폴더를 선택하고 우클릭하여 File을 추가한다.

Select a wizard 창이 뜨면 File을 선택하고 Next > 버튼을 클릭한다.

File name 입련창에 database.properties 라고 입력한다.

Finish 버틑을 클릭하면 database.properties 파일이 추가된다.
database.properties 파일이 생성되면 아래와 같이 Oracle DB의 접속정보를 추가하여 준다.
database.properties
#### Oracle DB Info ####
jdbc.driver = oracle.jdbc.driver.OracleDriver
jdbc.url = jdbc:oracle:thin:@localhost:1521:orcl
jdbc.username = oracle_사용자_계정
jdbc.password = oracle_사용자_비밀번호
database.properties 파일은 일반적으로 다음과 같은 속성을 가진다.
| driver | · JDBC 드라이버 클래스 이름을 지정합니다. |
| url | · 데이터베이스 URL을 지정합니다. |
| username | · 데이터베이스에 연결할 때 사용할 사용자 이름을 지정합니다. |
| password | · 데이터베이스에 연결할 때 사용할 암호를 지정합니다. |
2) DataBase 연결 - context-datasource.xml 파일 생성
context-datasource.xml은 Spirng Framework에서 데이터베이스 연결을 관리하기 위해 사용되는 XML 구성 파일이다.
이 파일은 DataSource 인터페이스의 구현체를 생성하고 구성하는데 사용된다.
DataSource 인터페이스는 DataBase 연결을 가져오기 위한 표준 인터페이스이다.
프로젝트 src/main/resources의 spring 폴더를 선택하고 context-datasource.xml 파일을 생성한다.

spring 폴더를 선택하고 마우스 우클릭한 뒤 New → Other를 선택한다.
XML File을 선택하고 Next > 버튼을 클릭한다.

생성할 XML 파일의 이름은 context-datasource.xml 이다.

Finish 버튼을 클릭하여 context-datasource.xml 파일을 생성한다.
context-datasource.xml 파일이 생성되면 아래 코드를 복사 붙여넣기 한다.
context-datasource.xml
<?xml version="1.0" encoding="UTF-8"?>
<beans xmlns="http://www.springframework.org/schema/beans"
	xmlns:xsi="http://www.w3.org/2001/XMLSchema-instance"
	xsi:schemaLocation="http://www.springframework.org/schema/beans http://www.springframework.org/schema/beans/spring-beans.xsd">

	<bean class="org.springframework.beans.factory.config.PropertyPlaceholderConfigurer">
	    <property name="locations">
	        <list>
			<value>classpath:/config/database.properties</value>
	        </list>
	    </property>
	    <property name="fileEncoding" value="UTF-8"></property>
	</bean>

	<!-- Oracle DataSource -->
	<bean id="dataSource" class="org.apache.commons.dbcp.BasicDataSource" destroy-method="close">
		<property name="driverClassName" value="${jdbc.driver}"/>
		<property name="url" value="${jdbc.url}"/>
		<property name="username" value="${jdbc.username}"/>
		<property name="password" value="${jdbc.password}"/>
	</bean>

</beans>
database.properties 파일을 호출하여 Oracle DB 접속 정보를 가져온다.
3) Controller와 요청 URL을 매핑 - context-mapper.xml 파일 생성
context-mapper.xml은 Spring Framework에서 MyBatis 라이브러리를 사용하여 DataBase 쿼리를 실행하는 데 사용되는 XML 구성 파일이다.
이 파일은 MyBatis 매퍼를 정의하고 구성하는 데 사용한다.
MyBatis 매퍼는 DataBase 쿼리를 실행하는 데 사용되는 SQL 문과 Java 객체 간의 매핑 규칙을 정의한다.
프로젝트 src/main/resources의 spring 폴더를 선택하고 context-datasource.xml 파일을 생성한다.

spring 폴더를 선택하고 마우스 우클릭한 뒤 New → Other를 선택한다.
XML File을 선택하고 Next > 버튼을 클릭한다.

생성할 XML 파일의 이름은 context-mapper.xml 이다.

Finish 버튼을 클릭하여 context-mapper.xml 파일을 생성한다.
context-mapper.xml 파일이 생성되면 아래 코드를 복사 붙여넣기 한다.
context-mapper.xml
<?xml version="1.0" encoding="UTF-8"?>
<beans xmlns="http://www.springframework.org/schema/beans"
	xmlns:xsi="http://www.w3.org/2001/XMLSchema-instance"
	xsi:schemaLocation="
      http://www.springframework.org/schema/beans
      http://www.springframework.org/schema/beans/spring-beans.xsd">

	<!-- Spring과 MyBatis 연동 설정 -->
	<bean id="sqlSession" class="org.mybatis.spring.SqlSessionFactoryBean">
		<property name="dataSource" ref="dataSource"></property>
		<property name="configLocation" value="classpath:/sqlmap/sql-mapper-config.xml"></property>
		<property name="mapperLocations" value="classpath:sqlmap/mappers/*-mapping.xml"></property>
	</bean>

	<bean class="org.mybatis.spring.mapper.MapperScannerConfigurer">
		<property name="basePackage" value="com.spring.web.*.service.impl"></property>
	</bean>

</beans>
Spring과 MyBatis 연동 설정에 필요한 속성은 아래와 같다.
| dataSource | context-datasource.xml 파일에 있는 id가 dataSource인 bean을 참조하여 MyBatis와 DB 연동 |
| configLocation | MyBatis 설정이 담겨있는 xml 파일이 위치한 경로를 잡아준다. |
| mapperLocations | DB에 보낼 쿼리가 담겨있는 MyBatis의 xml 파일들이 위치한 경로를 잡아준다. |
5) 아이디 제너레이션 서비스 설정 - context-idgen.xml 파일 생성
이 파일은 DataBase에서 고유 ID 값을 생성하는 방법을 정의하며, 주로 자동 증가형 시퀀스 대신에 사용된다.
데이터베이스 기반 ID 생성은 복수의 서버에서 작업하는 경우에도 동시성 문제를 해결하는 데 도움이 되며,
시퀀스 대신 사용되므로 유연성이 높다.
표준 프레임워크가 제공하는 아이디 제너레이션 기능을 사용하면 Table의 Primary Key값을
"SAMPLE-00001"과 같이 복잡한 문자열을 저장하도록 설정할 수 있다.
프로젝트 src/main/resources의 spring 폴더를 선택하고 context-idgen.xml 파일을 생성한다.

spring 폴더를 선택하고 마우스 우클릭한 뒤 New → Other를 선택한다.
XML File을 선택하고 Next > 버튼을 클릭한다.

생성할 XML 파일의 이름은 context-idgen.xml 이다.

Finish 버튼을 클릭하여 context-idgen.xml 파일을 생성한다.
context-idgen.xml 파일이 생성되면 아래 코드를 복사 붙여넣기 한다.
context-idgen.xml
<?xml version="1.0" encoding="UTF-8"?>
<beans xmlns="http://www.springframework.org/schema/beans"
	xmlns:xsi="http://www.w3.org/2001/XMLSchema-instance"
	xsi:schemaLocation="http://www.springframework.org/schema/beans http://www.springframework.org/schema/beans/spring-beans.xsd">

	<bean id="messageSource" class="org.springframework.context.support.ReloadableResourceBundleMessageSource">
		<property name="basenames">
			<list>
				<value>classpath:/egovframework/rte/fdl/idgnr/messages/idgnr</value>
			</list>
		</property>
	</bean>

	<bean name="exampleIdGnrService" class="egovframework.rte.fdl.idgnr.impl.EgovTableIdGnrServiceImpl" destroy-method="destroy">
		<property name="dataSource" ref="dataSource"/>
		<property name="strategy" ref="examplePrefixTransfer"/>
		<property name="blockSize" value="1"/>
		<property name="table" value="ID_GENERATION"/>
		<property name="tableName" value="EXAMPLE_BOARD"/>
	</bean>

	<bean name="examplePrefixTransfer" class="egovframework.rte.fdl.idgnr.impl.strategy.EgovIdGnrStrategyImpl">
		<property name="prefix" value="EX"/>
		<property name="cipers" value="8"/>
		<property name="fillChar" value="0"/>
	</bean>

</beans>
<bean name="exampleIdGnrService">

| stategy | 아이디 생성 전략 객체를 참조 |
| blockSize | 아이디 생성을 위해 DB접속을 최적화하기 위해 내부적으로 사용하는 정보 ( 한번 DB접속할 때마다 blockSize만큼 키값을 증가시킨다. ) |
| table | 유일한 아이디가 저장된 테이블 이름 |
| tableName | 생성할 아이디를 구분하기위한 키 값. 일반적으로 테이블 별로 아이디가 필요하기 때문에 테이블 이름을 지정한다. |
<bean name="examplePrefixTransfer">

| prefix | 생성할 아이디의 접두사를 지정한다. |
| cipers | 접두사를 제외한 숫자 부분의 자릿수를 지정한다. |
| fillChar | cipers에서 지정한 자릿수에서 증가값을 제외한 나머지 빈 공간을 채울 문자를 지정한다. |
#4. MyBatis 프레임워크 설정
1) sql-mapper-config.xml 파일 생성
sql-mapper-config.xml은 MyBatis 프레임워크에서 SQL 매핑 정보를 설정하는 XML 파일이다.
프로젝트 src/main/resources를 선택하고 New → Other 를 선택한다.

Select a wizard 팝업창이 뜨면 Folder를 선택하여 신규 폴더를 생성한다.

Folder name은 sqlmap으로 src/main/resources 경로에 추가한다.

sqlmap 폴더를 선택하고 New → Other를 선택한다.

Select a wizard 팝업창이 뜨면 XML File을 선택하여 신규 XML 파일을 생성한다.

File nam 입력란에 sql-mapper-config.xml 을 입력한다.

Finish 버튼을 클릭하여 sql-mapper-config.xml 파일을 생성한다.
sql-mapper-config.xml 파일이 생성되면 아래 코드를 복사하여 붙여넣기 한다.
sql-mapper-config.xml
<?xml version="1.0" encoding="UTF-8"?>
<!DOCTYPE configuration PUBLIC "-//mybatis.org//DTD Config 3.0//EN" "http://mybatis.org/dtd/mybatis-3-config.dtd">
<configuration>
    <typeAliases>
        <typeAlias type="com.spring.web.example.service.ExampleVO" alias="example"/>
    </typeAliases>
</configuration>
2) SqlSessionFactoryBean.java 클래스 파일 생성
SqlSessionFactoryBean.java는 Spring 프레임워크에서 MyBatis와 함께 사용되는 클래스 파일이다.
이 클래스는 MyBatis의 SqlSessionFactory를 생성하고, 이를 Spring ApplicationContext에서 사용할 수 있는 bean으르 등록한다.
SqlSessionFactoryBean 클래스는 org.mybatis.spring.SqlSessionFactoryBean 패키지에 위치며,
org.springframework.beans.factory.FactoryBean 인터페이스를 구현한다.
이 클래스는 Spring의 BeanFactory에서 bean으로 생성되는 객체가 아니라,
SqlSessionFactoryBean 객체 자체가 빈으로 등록됩니다.
src/main/java 경로에 새로운 Package를 생성한다.

src/main/java 경로를 선택하고 마우스 우클릭하여 New → Package 를 선택한다.
New Java Package 입력창이 뜨면

com.spring.web.util을 입력하고 Finish 버튼을 클릭하여 신규 패키지를 생성한다.
com.spring.web.util 패키지가 생성되면 SqlSessionFactoryBean.java 클래스 파일을 생성한다.

com.spring.web.util 패키지를 선택하고 New → Class 를 선택한다.
New Java Class 팝업창에 클래스 이름 입력란에 SqlSessionFactoryBean을 입력한다.

Finish 버튼을 클릭하여 SqlSessionFactoryBean.java 클래스 파일을 생성한다.
SqlSessionFactoryBean.java 클래스 파일이 생성되면 아래 코드를 복사 붙여넣기 한다.
SqlSessionFactoryBean.java
package com.spring.web.util;

import org.apache.ibatis.io.Resources;
import org.apache.ibatis.session.SqlSession;
import org.apache.ibatis.session.SqlSessionFactory;
import org.apache.ibatis.session.SqlSessionFactoryBuilder;

import java.io.Reader;

public class SqlSessionFactoryBean {

    private static SqlSessionFactory sessionFactory = null;

    static {
        try {
            if(sessionFactory == null) {
                Reader reader = Resources.getResourceAsReader("sql-mapper-config");
                sessionFactory = new SqlSessionFactoryBuilder().build(reader);
            }
        } catch(Exception e) {
            e.printStackTrace();
        }
    }

    public static SqlSession getSqlSessionInstance() {
        return sessionFactory.openSession();
    }
}
3) SQL 매핑정보를 담고 있는 example-mapping.xml 파일 생성
*-mapping.xml 파일은 SQL 매핑 정보를 담고 있는 파일이다.
이 파일은 SQL 쿼리와 Java 객체간의 매핑 정보를 설정하여, 데이터베이스와의 상호작용을 수행한다.
src/main/resources 경로의 sqlmap 폴더 내부에 새로운 Folder를 생성한다.

src/main/resources 경로의 sqlmap 폴더를 선택하고 New → Folder를 선택한다.
Folder name입력란에 mappers 라고 입력한다.

Finish 버튼을 클릭하여 mappers 폴더를 생성한다.
생성된 mappers 폴더를 안에 XML 파일을 추가한다.

mappers 폴더를 선택하고 마우스 우클릭하여 New → Other 버튼을 클릭하여 XML 파일을 생성한다.
Select a wizard 팝업창이 뜨면 XML File을 선택한다.

Next > 버튼을 클릭한다.
File name 입력창에 example-mapping.xml 이라고 입력한다.

Finish 버튼을 클릭하면 example-mapping.xml 파일이 생성된다.
example-mapping.xml 파일이 생성되면 아래 코드를 복사 붙여넣기 하여준다.
example-mapping.xml
<?xml version="1.0" encoding="UTF-8"?>
<!DOCTYPE mapper PUBLIC "-//mybatis.org//DTD Mapper 3.0//EN" "http://mybatis.org/dtd/mybatis-3-mapper.dtd">
<mapper namespace="com.spring.web.example.service.impl.ExampleMapper">

    <resultMap id="exampleResult" type="example">
        <id property="exampleNumber" column="EXAMPLE_NUMBER"/>
        <result property="exampleId" column="EXAMPLE_ID"/>
        <result property="exampleName" column="EXAMPLE_NAME"/>
        <result property="exampleTitle" column="EXAMPLE_TITLE"/>
        <result property="exampleInfo" column="EXAMPLE_INFO"/>
        <result property="exampleDate" column="EXAMPLE_DATE" jdbcType="DATE" javaType="java.sql.Date"/>
    </resultMap>

    <select id="selectExample" resultMap="exampleResult">
        SELECT example_number, example_id, example_name, example_title, example_info, example_date FROM example_board WHERE 1 = 1
        <if test="exampleNumber!=null and !exampleNumber.equals('')">
            AND EXAMPLE_NUMBER = #{exampleNumber}
        </if>
    </select>

    <select id="selectCountExample" resultType="int">
        SELECT COUNT(EXAMPLE_NUMBER) AS countNumber FROM EXAMPLE_BOARD WHERE 1 = 1
        <if test="exampleId!=null and !exampleId.equals('')">
            AND EXAMPLE_ID = #{exampleId}
        </if>
    </select>

    <select id="selectListExample" parameterType="int" resultMap="exampleResult">
		SELECT * FROM (
			SELECT
				ROWNUM AS ROW_NUM, COUNT(*) OVER() AS TOTAL_CNT, EX.EXAMPLE_NUMBER, EX.EXAMPLE_ID, EX.EXAMPLE_NAME, EX.EXAMPLE_TITLE, EX.EXAMPLE_INFO, EX.EXAMPLE_DATE
			FROM (
				SELECT EXAMPLE_NUMBER, EXAMPLE_ID, EXAMPLE_NAME, EXAMPLE_TITLE, EXAMPLE_INFO, EXAMPLE_DATE
				FROM EXAMPLE_BOARD WHERE 1 = 1
				ORDER BY EXAMPLE_NUMBER DESC
			) EX
		)
		<![CDATA[
			WHERE ROW_NUM >= #{startRow} AND ROW_NUM <= #{endRow}
		]]>
    </select>

    <insert id="insertExample" useGeneratedKeys="true" keyProperty="exampleNumber" parameterType="example">
        INSERT INTO EXAMPLE_BOARD(EXAMPLE_NUMBER, EXAMPLE_ID, EXAMPLE_NAME, EXAMPLE_TITLE, EXAMPLE_INFO, EXAMPLE_DATE)
        VALUES(#{exampleNumber}, #{exampleId}, #{exampleName}, #{exampleTitle}, #{exampleInfo}, #{exampleDate})
    </insert>

    <update id="updateExample">
        UPDATE EXAMPLE_BOARD SET
              EXAMPLE_NAME = #{exampleName}
            , EXAMPLE_TITLE = #{exampleTitle}
            , EXAMPLE_INFO = #{exampleInfo}
            , EXAMPLE_DATE = #{exampleDate}
        WHERE 1 = 1
          AND EXAMPLE_NUMBER = #{exampleNumber}
          AND EXAMPLE_ID = #{exampleId}
    </update>

    <delete id="deleteExample">
        DELETE FROM EXAMPLE_BOARD WHERE 1 = 1
        AND EXAMPLE_NUMBER = #{exampleNumber};
    </delete>
</mapper>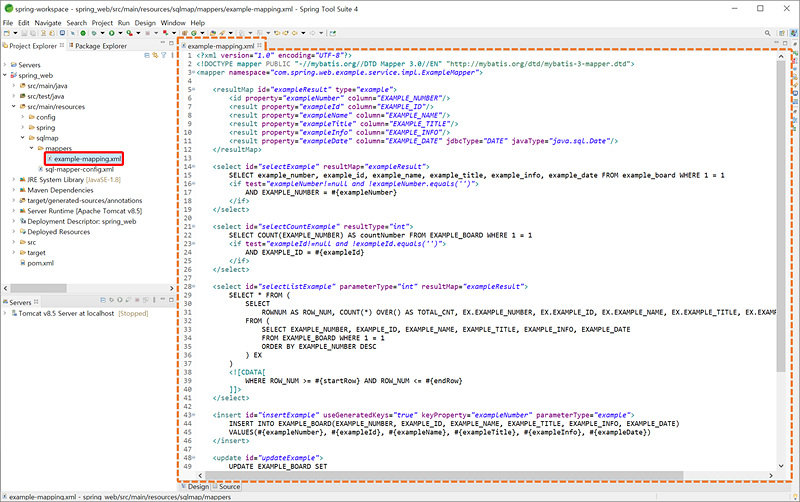
#5. Data Access Layer 만들기
1) ExampleVO 클래스 수정하기
ExampleVO 파일을 열고 내용을 ExampleVO( ) 메서드의 내용을 삭제한다.

pom.xml
package com.spring.web.example.service;

import java.util.Date;

import org.springframework.format.annotation.DateTimeFormat;

public class ExampleVO {

    private String exampleNumber;
    private String exampleId;
    private String exampleName;
    private String exampleTitle;
    private String exampleInfo;

    @DateTimeFormat(pattern = "yyyy-MM-dd")
    private Date exampleDate;

    public String getExampleNumber() {
    	return exampleNumber;
    }

    public void setExampleNumber(String exampleNumber) {
    	this.exampleNumber = exampleNumber;
	}

	public String getExampleId() {
		return exampleId;
	}

	public void setExampleId(String exampleId) {
		this.exampleId = exampleId;
	}

	public String getExampleName() {
		return exampleName;
	}

	public void setExampleName(String exampleName) {
		this.exampleName = exampleName;
	}

	public String getExampleTitle() {
		return exampleTitle;
	}

	public void setExampleTitle(String exampleTitle) {
		this.exampleTitle = exampleTitle;
	}

	public String getExampleInfo() {
		return exampleInfo;
	}

	public void setExampleInfo(String exampleInfo) {
		this.exampleInfo = exampleInfo;
	}

	public Date getExampleDate() {
		return exampleDate;
	}

	public void setExampleDate(Date exampleDate) {
		this.exampleDate = exampleDate;
	}
}
그럼 클래스 내부의 Line을 선택하고 마우스 우클릭하여 선택 메뉴창이 뜨면

Source → Generate toString( )을 선택한다.
Generate toString( ) 팝업창이 뜨면 ExampleVO에 선언한 모든 변수가 Check 되어 있는지 확인한다.

Generate 버튼을 클릭한다.
ExampleVO 클래스내부에 toString( ) 메서드가 추가가 정상적으로 추가되었는지 확인해 보자.

ExampleVO.java
package com.spring.web.example.service;

import java.util.Date;

import org.springframework.format.annotation.DateTimeFormat;

public class ExampleVO {

    private String exampleNumber;
    private String exampleId;
    private String exampleName;
    private String exampleTitle;
    private String exampleInfo;

    @DateTimeFormat(pattern = "yyyy-MM-dd")
    private Date exampleDate;

    public String getExampleNumber() {
    	return exampleNumber;
    }

    public void setExampleNumber(String exampleNumber) {
    	this.exampleNumber = exampleNumber;
	}

	public String getExampleId() {
		return exampleId;
	}

	public void setExampleId(String exampleId) {
		this.exampleId = exampleId;
	}

	public String getExampleName() {
		return exampleName;
	}

	public void setExampleName(String exampleName) {
		this.exampleName = exampleName;
	}

	public String getExampleTitle() {
		return exampleTitle;
	}

	public void setExampleTitle(String exampleTitle) {
		this.exampleTitle = exampleTitle;
	}

	public String getExampleInfo() {
		return exampleInfo;
	}

	public void setExampleInfo(String exampleInfo) {
		this.exampleInfo = exampleInfo;
	}

	public Date getExampleDate() {
		return exampleDate;
	}

	public void setExampleDate(Date exampleDate) {
		this.exampleDate = exampleDate;
	}

    @Override
    public String toString() {
        return "ExampleVO { "
            + "exampleNumber=\'" + exampleNumber + "\'"
            + ", exampleId=\'" + exampleId + "\'"
            + ", exampleName=\'" + exampleName + "\'"
            + ", exampleTitle=\'" + exampleTitle + "\'"
            + ", exampleInfo=\'" + exampleInfo + "\'"
            + ", exampleDate=" + exampleDate
            + " }";
    }
}
위와같이 ExampleVO 클래스 파일에 toString( ) 메소드가 추가되어 있다.
2) ExampleMapper 인터페이스 생성
Mapper 인터페이스는 MyBatis 프레임워크에서 데이터 베이스와 연결하여 SQL 쿼리를 실행하는 인터페이스이다.
Mapper 인터페이스는 DataBase에 접근하기 위해 사용되는 SQL 매핑 파일과 연결되어 있다.
이 매핑 파일은 SQL 쿼리문과 DataBase 테이블 간의 매핑을 지정하는 역항르 수행한다.
Mapper 인터페이스를 사용하면 코드에서 SQL 쿼리문을 직접 작성하지 않고, 매핑 파일에서 지정한 쿼리문을 실행할 수 있다.
이를 통해 코드의 가독성을 높일 수 있으며, SQL 쿼리문을 변경해야 할 경우에도 매핑 파일만 수정하면 되므로 유지보수가 용이해진다.
src/main/java 경로를 선택하고 마우스 우클릭하여 새로운 Package를 생성한다.

새로 생성할 패키지의 이름은 com.spring.web.example.service.impl 이다.

Finish 버튼을 클릭하여 com.spring.web.example.service.impl 패키지를 생성한다.
com.spring.web.example.service.impl 패키지가 생성되었다면 Interface를 하나 추가한다.
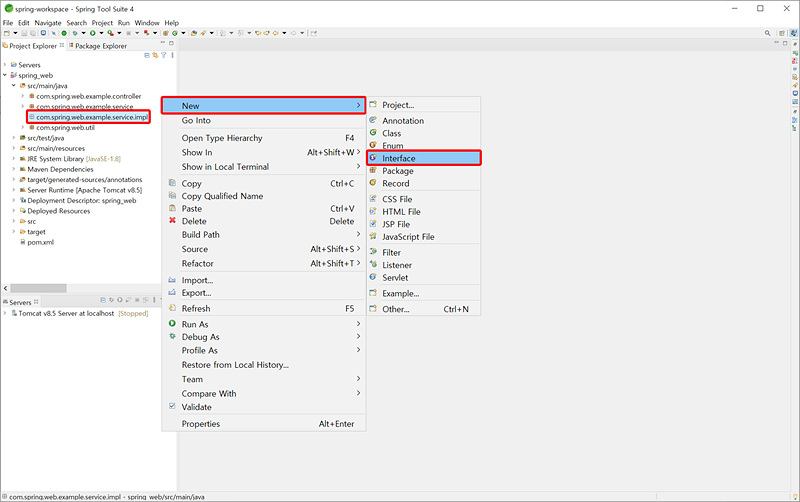
com.spring.web.example.service.impl 선택하고 마우스 우클릭 New → Interface를 선택한다.
신규 Java Interface를 생성한다. 이름은 ExampleMapper로 지정한다.

Finish 버튼을 클릭하여 ExampleMapper 인터페이스 파일을 생성한다.
ExampleMapper 인터페이스 파일이 생성되었으면 아래 코드내용을 복사 붙여넣기 한다.
ExampleMapper.java
package com.spring.web.example.service.impl;

import com.spring.web.example.service.ExampleVO;

import org.apache.ibatis.annotations.Mapper;
import org.apache.ibatis.annotations.Param;

import java.util.List;

@Mapper
public interface ExampleMapper {

    ExampleVO selectExample(ExampleVO vo) throws Exception;

    int selectCountExample(ExampleVO vo) throws Exception;

    List<ExampleVO> selectListExample(ExampleVO vo, @Param("startRow") int startRow, @Param("endRow") int endRow) throws Exception;

    int insertExample(ExampleVO vo) throws Exception;

    int updateExample(ExampleVO vo) throws Exception;

    int deleteExample(ExampleVO vo) throws Exception;
}
3) ExampleDao 인터페이스 생성
DAO( Data Access Object ) 인터페이스는 데이터 베이스와의 상호 작용을 위한 메서드로 정의된 인터페이스이다.
DAO 인터페이스는 데이터베이스에 접근하는 모든 작업을 추상화하고,
비즈니스 로직과 데이터 액세스 로직을 분리하여 유지보수성과 확장성을 높이는 역할을 수한다.
DAO 인터페이스는 데이터베이스에서 CRUD( Create, Read, Update, Delete ) 작업을 수행하는 메서드를 포함한다.
또한, 검색 작업이나 트랜잭션 처리 등의 다양한 데이터 액세스 로직을 구현할 수 있다.
DAO 인터페이스는 주로 JDBC, Hibernate, MyBatis 등의 ORM(Object-Relational Mapping) 프레임워크와 함께 사용된다.
이를 통해 개발자는 데이터베이스와의 상호 작용을 추상화하고, ORM 프레임워크가 제공하는 다양한 기능을 활용하여 보다 쉽고 효율적으로 데이터베이스와 상호 작용할 수 있습니다.
DAO 인터페이스는 비즈니스 로직과 데이터 액세스 로직을 분리하여 코드의 가독성과 유지보수성을 높이는 장점이 있다.
또한, DAO 인터페이스를 사용하면 데이터베이스와의 상호 작용이 일관된 방식으로 이루어지므로 코드의 일관성과 안정성을 보장할 수 있습니다.
com.spring.web.example.service 패키지를 선택하고 신규 인터페이스를 추가한다.

com.spring.web.example.service 선택하고 마우스 우클릭 New → Interface를 선택한다.
신규 Java Interface를 생성한다. 이름은 ExampleDAO로 지정한다.

Finish 버튼을 클릭하여 ExampleDAO 인터페이스 파일을 생성한다.
ExampleDAO 인터페이스 파일이 생성되었으면 아래 코드내용을 복사 붙여넣기 한다.
ExampleDAO.java
package com.spring.web.example.service;

import java.util.List;

public interface ExampleDAO {

	ExampleVO selectExample(ExampleVO vo) throws Exception;

	int selectCountExample(ExampleVO vo) throws Exception;

	List<ExampleVO> selectListExample(ExampleVO vo, int startRow, int endRow) throws Exception;

	int insertExample(ExampleVO vo) throws Exception;

	int updateExample(ExampleVO vo) throws Exception;

	int deleteExample(ExampleVO vo) throws Exception;
}
4) ExampleDaoMyBatis 클래스 생성
DaoMyBatis 클래스는 MyBatis 프레임워크를 이용하여 데이터베이스와 상호 작용하는 DAO(Data Access Object) 클래스이다.
Mapper 인터페이스와 MyBatis 매핑 파일을 사용하여 SQL 쿼리를 작성하고 실행한다.
Mapper 인터페이스는 SQL 쿼리를 실행하는 메서드를 정의하며,
MyBatis 매핑 파일은 Mapper 인터페이스와 데이터베이스 테이블 간의 매핑을 지정하는 역할을 한다.
DaoMyBatis 클래스는 데이터베이스와의 상호 작용을 추상화하고, 비즈니스 로직과 데이터 액세스 로직을 분리하여 유지보수성과 확장성을 높이는 장점이 있다.
또한, MyBatis 프레임워크의 다양한 기능을 활용하여 보다 쉽고 효율적으로 데이터베이스와 상호 작용할 수 있다.
com.spring.web.example.service.impl 패키지를 선택하고 신규 클래스를 추가한다.

com.spring.web.example.service.impl 선택하고 마우스 우클릭 New → Class를 선택한다.
신규 Java Class를 생성한다. 이름은 ExampleDAOMyBatis로 지정한다.

Finish 버튼을 클릭하여 ExampleDAOMyBatis 클래스 파일을 생성한다.
ExampleDAOMyBatis 클래스 파일이 생성되었으면 아래 코드내용을 복사 붙여넣기 한다.
ExampleDAOMyBatis.java
package com.spring.web.example.service.impl;

import com.spring.web.example.service.ExampleDAO;
import com.spring.web.example.service.ExampleVO;

import org.springframework.stereotype.Repository;

import javax.annotation.Resource;
import java.util.List;

@Repository("exampleDaoMyBatis")
public class ExampleDAOMyBatis implements ExampleDAO {

    @Resource(name="exampleMapper")
    private ExampleMapper mybatis;

    public ExampleDAOMyBatis() {
        System.out.println("===> ExampleDAOMyBatis 생성");
    }

    public ExampleVO selectExample(ExampleVO vo) throws Exception {
        System.out.println("===> MyBatis로 selectExample() 기능 처리");
        return (ExampleVO) mybatis.selectExample(vo);
    }

    public int selectCountExample(ExampleVO vo) throws Exception {
        System.out.println("===> MyBatis로 selectCountExample() 기능 처리");
        return mybatis.selectCountExample(vo);
    }

    public List<ExampleVO> selectListExample(ExampleVO vo, int startRow, int endRow) throws Exception {
        System.out.println("===> MyBatis로 selectListExample() 기능 처리");
        return mybatis.selectListExample(vo, startRow, endRow);
    }

    public int insertExample(ExampleVO vo) throws Exception {
        System.out.println("===> MyBatis로 insertExample() 기능 처리");
        return mybatis.insertExample(vo);
    }

    public int updateExample(ExampleVO vo) throws Exception {
        System.out.println("===> MyBatis로 updateExample() 기능 처리");
        return mybatis.updateExample(vo);
    }

    public int deleteExample(ExampleVO vo) throws Exception {
        System.out.println("===> MyBatis로 deleteExample() 기능 처리");
        return mybatis.deleteExample(vo);
    }
}
#6. Buisiness Layer 만들기
1) ExampleService 인터페이스 생성
Service 인터페이스는 어플리케이션의 Buisiness 로직을 정의하고 제공하는 인터페이스이다.
이 이턴페이스는 Presentation Layer와 Data Access Layer 사이에서 중재자 역할을 수행하며,
사용자 인터페이스 또는 외부 시슽메에서 요청을 받아 비즈니스 로직을 수행한다.
Service 인터페이스는 일반적으로 비즈니스 로직 메서드를 정의하고, 해당 메서드에 대한 파라미터와 리턴 타입을 명시한다.
이 인터페이스는 Presentation Layer와 Data Access Layer를 분리하기 위해 사용되며, 이를 통해 더 나은 유지 보수성과 확장성을 제공한다.
Service 인터페이스의 구현체는 보통 Spring Framework에서 빈( Bean )으로 등록되어 사용된다.
이러한 Service 빈은 일반적으로 Transational 처리와 같은 비즈니스 로직에 필요한 기능을 포함하다.
또한, Service 빈은 일반적으로 Data Access Layer와 협력하여 영속성( Persistence ) 관리 및 데이터 접근을 수행한다.
com.spring.web.example.service 패키지 내부에 서비스 인터페이스를 추가한다.

com.spring.web.example.service를 선택하고 마우스 우클릭하여 New → Inteface를 선택한다.
New Java Interface 창이 팝업되면 인터페이스 이름을 ExampleService를 입력한다.

Finish 버튼을 클릭하여 ExampleService.java 인터페이스 파일을 생성한다.
ExampleService.java 인터페이스 파일이 생성되면 아래 코드를 복사 붙여넣기 하여 추가한다.
ExampleService.java
package com.spring.web.example.service;

import java.util.List;

public interface ExampleService {

    /* @brief  사용자 정보 등록*/
    ExampleVO selectExample(ExampleVO vo) throws Exception;

    int selectCountExample(ExampleVO vo) throws Exception;

    List<ExampleVO> selectListExample(ExampleVO vo, int startRow, int endRow) throws Exception;

    /* @brief  사용자 정보 등록*/
    int insertExample(ExampleVO vo) throws Exception;

    /* @brief  사용자 정보 수정 */
    int updateExample(ExampleVO vo) throws Exception;

    /* @brief  사용자 삭제 */
    int deleteExample(ExampleVO vo) throws Exception;
}
위의 예제 코드에서는 ExampleService 인터페이스를 정의하고, 비즈니스 로직 메서드를 정의한다.
이 인터페이스는 Presentation Layer와 Data Access Layer 사이에서 중재자 역할을 수행하며,
이를 구현하는 Service 빈은 일반적으로 Spring Framework에서 제공하는
@Service 어노테이션을 이용하여 빈으로 등록됩니다.
2) ExampleServiceImpl 클래스 생성
ServiceImpl 클래스는 비즈니스 로직을 구현하는 클래스로, 비즈니스 레이어 Service 인터페이스의 구현체이다.
이 클래스는 Service 인터페이스의 메소드를 구현하고,Data Access Layer와 협력하여 DataBase에 대한 영속성 처리를 수행한다.
Service 인터페이스를 구현하는 구현체는 일반적으로 ServiceImpl 클래스의 이름을 가진다.
이 클래스는 일반적으로 Spring Framework에서 @Service 어노테이션을 사용하여 빈( Bean )으로 등록된다.
ServiceImpl 클래스의 주요 역할은 Service 인터페이스의 메소드를 구현하는 것이다.
이 클래스는 메소드의 파라미터를 검증하고, 필요한 데이터 액세스 레이어 메소드를 호출하여 데이터를 가져오거나 변경한다.
또한, 이 클래스는 일반적으로 트랜잭션( Transaction )을 관리하며, 예외 처리 등의 비즈니스 로직 관련 작업을 수행한다.
com.spring.web.example.service.impl 패키지 내부에 ServiceImpl 클래스 파일을 추가한다.

com.spring.web.example.service.impl을 선택하고 마우스 우클릭하여 New → Class를 선택한다.
New Java Class 창이 팝업되면클래스 이름을 ExampleServiceImpl을 입력한다.

Finish 버튼을 클릭하여 ExampleServiceImpl.java 클래스 파일을 생성한다.
ExampleServiceImpl.java 파일이 생성되면 아래 코드를 복사하여 추가한다.
아래는 ExampleService 인터페이스를 구현하는 ExampleServiceImpl 클래스이다.
ExampleServiceImpl.java
package com.spring.web.example.service.impl;

import com.spring.web.example.service.ExampleDAO;
import com.spring.web.example.service.ExampleService;
import com.spring.web.example.service.ExampleVO;

import org.springframework.stereotype.Service;

import egovframework.rte.fdl.idgnr.EgovIdGnrService;

import javax.annotation.Resource;
import java.util.List;

@Service("exampleService")
@Transactional
public class ExampleServiceImpl implements ExampleService {

    @Resource(name="exampleDaoMyBatis")
    private ExampleDAO exampleDAO;

    @Resource(name="exampleIdGnrService")
    private EgovIdGnrService egovIdGnrService;

    public ExampleVO selectExample(ExampleVO vo) throws Exception {
        return exampleDAO.selectExample(vo);
    }

    public int selectCountExample(ExampleVO vo) throws Exception {
        return exampleDAO.selectCountExample(vo);
    }

    public List<ExampleVO> selectListExample(ExampleVO vo, int startRow, int endRow) throws Exception {
        return exampleDAO.selectListExample(vo, startRow, endRow);
    }

    public int insertExample(ExampleVO vo) throws Exception {
        String numberIdGen = egovIdGnrService.getNextStringId();
        vo.setExampleNumber(numberIdGen);
        return exampleDAO.insertExample(vo);
    }

    public int updateExample(ExampleVO vo) throws Exception {
        return exampleDAO.updateExample(vo);
    }

    public int deleteExample(ExampleVO vo) throws Exception {
        return exampleDAO.deleteExample(vo);
    }
}
위의 코드에서는 ExampleService 인터페이스를 구현하는 ExampleServiceImpl 클래스를 정의한다.
이 클래스는 ExampleMapper 인터페이스를 주입받아 Data Access Layer와 협력하며, 게시판 관련 비즈니스 로직을 구현한다.
또한, @Service 어노테이션을 이용하여 Service 빈으로 등록하고, @Transactional 어노테이션을 이용하여 트랜잭션을 관리한다.
#7. Presentation Layer 만들기
1) 컨트롤롤러( Controller ) 작성
① ExampleController 클래스 수정
이전 포스팅에서 작성한 ExampleController 클래스를 수정한다.

ExampleController.java
package com.spring.web.example.controller;

import com.spring.web.util.OutputPagination;
import com.spring.web.example.service.ExampleService;
import com.spring.web.example.service.ExampleVO;

import org.springframework.stereotype.Controller;
import org.springframework.ui.Model;
import org.springframework.web.bind.annotation.RequestMapping;
import org.springframework.web.bind.annotation.RequestMethod;
import org.springframework.web.bind.annotation.ResponseBody;

import javax.annotation.Resource;
import javax.servlet.http.HttpServletRequest;
import javax.servlet.http.HttpServletResponse;
import java.io.PrintWriter;
import java.text.SimpleDateFormat;
import java.util.HashMap;
import java.util.Map;

@Controller
public class ExampleController {

    @Resource(name="exampleService")
    private ExampleService exampleService;

    Map<String, String> resultMap = new HashMap<String, String>();

    @RequestMapping(value = "/example.do", method = RequestMethod.GET)
    public String ExampleMain() {
        return "example";
    }

    @RequestMapping(value = "/exampleInfo.do", method = RequestMethod.GET)
    public String exampleInfo(ExampleVO vo, HttpServletRequest request, Model model) throws Exception {

        if(request.getParameter("number").isEmpty() == false) {

            vo.setExampleNumber(request.getParameter("number"));
            ExampleVO exampleVO = exampleService.selectExample(vo);
            model.addAttribute("exampleId", exampleVO.getExampleId());

            model.addAttribute("exampleName", exampleVO.getExampleName());
            model.addAttribute("exampleTitle", exampleVO.getExampleTitle());
            model.addAttribute("exampleInfo", exampleVO.getExampleInfo());
            model.addAttribute("exampleDate", exampleVO.getExampleDate());
        }
        return "exampleInfo";
    }

    @RequestMapping(value = "/exampleList.do")
    public String exampleList(ExampleVO vo, HttpServletRequest request, Model model) throws Exception {

        int totalRow = exampleService.selectCountExample(vo);       // 해당 테이블의 전체 갯수

        int startRow = 1;	// 출력 페이지 시작번호
        int endRow = 10;	// 출력 페이지 종료번호

        int choicePage = 1;	// 선택 페이지 번호( DefaultValue = 1 )
        int limitRow = 10;	// 게시판 List 출력 ROW 최대 개수


        if(request.getParameter("page") != null && request.getParameter("page").length() > 0) {
            choicePage = Integer.parseInt(request.getParameter("page"));
            startRow = (choicePage - 1) * limitRow + 1;
            endRow = endRow * choicePage;
        }

        model.addAttribute("exampleList", exampleService.selectListExample(vo, startRow, endRow));
        model.addAttribute("examplePagination", OutputPagination.outputServletPagination(choicePage, limitRow, totalRow, "exampleMovePage"));

        return "exampleList";
    }

    @RequestMapping(value = "/exampleWrite.do")
    public String exampleWrite() throws Exception {
        return "exampleWrite";
    }

    @RequestMapping(value = "/exampleRevise.do", method = RequestMethod.GET)
    public String exampleRevision(ExampleVO vo, HttpServletRequest request, Model model) throws Exception {

        vo.setExampleNumber(request.getParameter("number"));

        ExampleVO exampleVO = exampleService.selectExample(vo);
        // System.out.println( "exampleVO.toString() : " + exampleVO.toString());

        model.addAttribute("exampleNumber", request.getParameter("number"));
        model.addAttribute("exampleId", exampleVO.getExampleId());
        model.addAttribute("exampleName", exampleVO.getExampleName());
        model.addAttribute("exampleTitle", exampleVO.getExampleTitle());
        model.addAttribute("exampleInfo", exampleVO.getExampleInfo());
        model.addAttribute("exampleDate", exampleVO.getExampleDate());

        return "exampleRevise";
    }

    @ResponseBody
    @RequestMapping(value = "/verificationDuplicateId.do", method = RequestMethod.POST)
    public Map verificationDuplicateId(ExampleVO vo, HttpServletRequest request) throws Exception {

        if(request.getParameter("exampleId").isEmpty() == false) {
            vo.setExampleId(request.getParameter("exampleId"));
        } else {
            vo.setExampleId(null);
        }

        int resultCount = exampleService.selectCountExample(vo);
        // System.out.println( "exampleVO.toString() : " + exampleVO.toString());

        if(resultCount > 0) {
            resultMap.put("result", "fail");
            resultMap.put("message", request.getParameter( "exampleId" ) + "는\n이미 사용중인 아이디 입니다.");
        } else {
            resultMap.put("result", "success");
            resultMap.put("message", "사용가능한 아이디 입니다.");
        }

        return resultMap;
    }

    @ResponseBody
    @RequestMapping(value = "/exampleRegistryWrite.do", method = RequestMethod.POST)
    public void exampleRegistryWrite(ExampleVO vo, HttpServletRequest request, HttpServletResponse response) throws Exception {

        if(request.getParameter("exampleId").isEmpty() == false) {
            vo.setExampleId(request.getParameter("exampleId"));
        }

        if(request.getParameter("exampleName").isEmpty() == false) {
            vo.setExampleName(request.getParameter("exampleName"));
        }

        if(request.getParameter("exampleTitle").isEmpty() == false) {
            vo.setExampleTitle(request.getParameter("exampleTitle"));
        }

        if(request.getParameter("exampleInfo").isEmpty() == false) {
            vo.setExampleInfo(request.getParameter("exampleInfo"));
        }

        if(request.getParameter("exampleDate").isEmpty() == false) {
            SimpleDateFormat formatter = new SimpleDateFormat("yyyy-MM-dd");
            vo.setExampleDate(formatter.parse(request.getParameter("exampleDate")));
        }


        int resultNumber = exampleService.insertExample(vo);
        // System.out.println( "exampleVO.toString() : " + vo.toString());

        if(resultNumber > 0) {
            response.sendRedirect("./exampleList.do");
        } else {
            response.setCharacterEncoding("UTF-8");
            response.setContentType("text/html;charset=utf-8");
            PrintWriter out = response.getWriter();
            out.println("<script type='text/javascript'>alert('해당 글을 등록하는데 실패하였습니다.');</script>");
            out.flush();
        }
    }

    @ResponseBody
    @RequestMapping(value = "/exampleModifyWrite.do", method = RequestMethod.POST)
    public void exampleModifyWrite(ExampleVO vo, HttpServletRequest request, HttpServletResponse response) throws Exception {

        if(request.getParameter("exampleNumber").isEmpty() == false) {
            vo.setExampleNumber(request.getParameter("exampleNumber"));
        }

        if(request.getParameter("exampleId").isEmpty() == false) {
            vo.setExampleId(request.getParameter("exampleId"));
        }

        if(request.getParameter("exampleName").isEmpty() == false) {
            vo.setExampleName(request.getParameter("exampleName"));
        }

        if(request.getParameter("exampleTitle").isEmpty() == false) {
            vo.setExampleTitle(request.getParameter("exampleTitle"));
        }

        if(request.getParameter("exampleInfo").isEmpty() == false) {
            vo.setExampleInfo(request.getParameter("exampleInfo"));
        }

        if(request.getParameter("exampleDate").isEmpty() == false) {
            SimpleDateFormat formatter = new SimpleDateFormat("yyyy-MM-dd");
            vo.setExampleDate(formatter.parse(request.getParameter("exampleDate")));
        }

        int resultNumber = exampleService.updateExample(vo);
        // System.out.println( "exampleVO.toString() : " + vo.toString());

        if(resultNumber > 0) {
            response.sendRedirect("./exampleInfo.do?number=" + vo.getExampleNumber());
        } else {
            // 참고 : https://redcoder.tistory.com/195
            response.setCharacterEncoding("UTF-8");
            response.setContentType("text/html;charset=utf-8");
            PrintWriter out = response.getWriter();
            out.println("<script type='text/javascript'>alert('해당 글을 수정하는데 실패하였습니다.');</script>");
            out.flush();
        }
    }

    @RequestMapping(value = "/exampleRemove.do", method = RequestMethod.GET)
    public void exampleRemove(ExampleVO vo, HttpServletRequest request, HttpServletResponse response) throws Exception {

        if(request.getParameter("number").isEmpty() == false) {
            vo.setExampleNumber(request.getParameter("number"));
        }

        int resultNumber = exampleService.deleteExample(vo);

        if(resultNumber > 0) {
            response.setCharacterEncoding("UTF-8");
            response.setContentType("text/html;charset=utf-8");
            PrintWriter out = response.getWriter();
            out.println("<script type='text/javascript'>");
            out.println("alert('해당 글이 삭제되었습니다.');");
            out.println("window.location.href='./exampleList.do';");
            out.println("</script>");
            out.flush();
        } else {
            response.setCharacterEncoding("UTF-8");
            response.setContentType("text/html;charset=utf-8");
            PrintWriter out = response.getWriter();
            out.println("<script type='text/javascript'>alert('해당 글을 삭제하는데 실패하였습니다.');</script>");
            out.flush();
        }
    }
}
② 페이지 내비게이션( Page Navigation ) 생성
페이지 내비게이션을 생성할 Java Class 파일을 생성한다.

com.spring.web.util 패키지를 선택하고 New → Class를 선택한다.
새로운 클래스의 이름은 OutputPagination으로 지정한다.

Finish 버튼을 클릭하여 OutputPagination 클래스 파일을 생성한다.
OutputPagination 클래스 파일이 생성되면 아래 페이지 내비게이션 생성 코드를 추가한다.

OutputPagination.java
package com.spring.web.util;
public class OutputPagination {
public static String outputServletPagination(int choicePage, int limitRow, int totalRow, String executionFunction) {
int totalPage = (int)((totalRow - 1) / limitRow);
int lastPage = 0;
int prevPage = (int)((choicePage - 1) / 5) * 5;
if((prevPage + 4) > totalPage) {
lastPage = totalPage;
} else {
lastPage = prevPage + 4;
}
String pagination = "<ul class='pagination'>";
if(prevPage == 0) {
pagination += "<li class='pagination-btn'><a class='pagination-link' href='javascript:;'>첫페이지</a></li>";
pagination += "<li class='pagination-btn'><a class='pagination-link' href='javascript:;'><<</a></li>";
} else {
pagination += String.format("<li class='pagination-btn'><a class='pagination-link' href='javascript:;' onClick='%s(%s);'>첫페이지</a></li>", executionFunction, 1);
pagination += String.format("<li class='pagination-btn'><a class='pagination-link' href='javascript:;' onClick='%s(%s);'><<</a></li>", executionFunction, prevPage);
}
// 페이징 INDEX를 출력한다.
for(int pageNum = prevPage; pageNum <= lastPage; pageNum++) {
int disPage = pageNum + 1;
if(disPage == choicePage) {
pagination += String.format("<li class='pagination-btn active'><a class='pagination-link' href='javascript:;'>%s</a></li>", disPage);
} else {
pagination += String.format("<li class='pagination-btn'><a class='pagination-link' href='javascript:;' onClick=\"%s(%s);\">%s</a></li>", executionFunction, disPage, disPage);
}
}
if(lastPage != totalPage) {
int nextPage = prevPage + 6;
pagination += String.format("<li class='pagination-btn'><a class='pagination-link' href='javascript:;' onClick='%s(%s);'>>></a></li>", executionFunction, nextPage);
pagination += String.format("<li class='pagination-btn'><a class='pagination-link' href='javascript:;' onClick='%s(%s);'>끝페이지</a></li>", executionFunction, totalPage + 1);
} else {
pagination += "<li class='pagination-btn'><a class='pagination-link' href='javascript:;'>>></a></li>";
pagination += "<li class='pagination-btn'><a class='pagination-link' href='javascript:;'>끝페이지</a></li>";
}
String returnNav = pagination + "</ul>";
return returnNav;
}
}
2) View - JSP 파일 작성
① exampleList.jsp - 게시글 리스트
기존에 만들었던 exampleList.jsp 파일의 내용을 전부 수정한다.

exampleList.jsp
<%@ page contentType="text/html;charset=UTF-8" language="java"%>
<%@ taglib uri="http://java.sun.com/jsp/jstl/core" prefix="c"%>
<%@ taglib uri="http://java.sun.com/jsp/jstl/fmt" prefix="fmt"%>
<html>
<head>
    <title>게시판 리스트</title>
</head>
<style type="text/css">
    table, thead, tbody, tfoot { border:1px solid #000000;border-collapse:collapse; }
    tfoot { text-align:right; }
    th, td { border:1px solid #000000;padding:10px; }
    tbody > tr > td { cursor:pointer;cursor:hand; }
    tbody > tr > td:first-child { text-align:center; }
    button { cursor:pointer;cursor:hand; }

    ul.pagination { list-style:none;margin:0;padding:0; }
    li.pagination-btn { margin-right:5px;margin-left:5px;border:0;float:left;}
    li.active { font-weight:bold; }
    a.pagination-link { color:#000000;text-decoration:none; }
</style>
<script type="text/javascript">
    document.addEventListener("DOMContentLoaded", function() {
        document.getElementById("btnWrite").addEventListener("click", function() {
            window.location.href = "./exampleWrite.do";
        });

        document.getElementsByClassName("")
    });

    function exampleMovePage(page) {
        window.location.href = "exampleList.do?page=" + page;
    }
</script>
<body>
<h1>${headTitle}</h1>
<table>
    <thead>
    <tr>
        <th>번호</th>
        <th>제목</th>
        <th>이름</th>
        <th>날짜</th>
    </tr>
    </thead>
    <tbody>
    <c:forEach var="example" items="${exampleList}">
        <tr onClick="window.location.href='/spring_web/exampleInfo.do?number=${example.exampleNumber}'">
            <td>${example.exampleNumber}</td>
            <td>${example.exampleTitle}</td>
            <td>${example.exampleName}(${example.exampleId})</td>
            <td><fmt:formatDate value="${example.exampleDate}" pattern="yyyy-MM-dd"/></td>
        </tr>
    </c:forEach>
    </tbody>
    <tfoot>
    <tr>
        <td colspan="4">
            <button id="btnWrite" type="button">새 글쓰기</button>
        </td>
    </tr>
    </tfoot>
</table>
<br/>
	${examplePagination}
</body>
</html>
② exampleInfo.jsp - 게시글 상세보기
기존에 만들었던 exampleInfo.jsp 파일의 내용을 전부 수정한다.

exampleInfo.jsp
<%@ page contentType="text/html;charset=UTF-8" language="java"%>
<html>
<head>
    <title>${exampleTitle}</title>
</head>
<style type="text/css">
    table, thead, tbody { border: 1px solid #000000;border-collapse:collapse; }
    th, td { border:1px solid #000000;padding:10px; }
    tfoot { text-align:right; }
</style>
<script type="text/javascript">
    document.addEventListener("DOMContentLoaded", function() {
        document.getElementById("btnList").addEventListener("click", function() {
            history.back();
        });

        document.getElementById("btnRemove").addEventListener("click", function() {
            if(confirm("해당 글을 삭제하시겠습니까?") == true) {
                window.location.href = "./exampleRemove.do?number=" + getParameter("number");
            }
        });

        document.getElementById("btnRevise").addEventListener("click", function() {
            window.location.href = "./exampleRevise.do?number=" + getParameter("number");
        });
    });

    var getParameter = function(param) {
        let returnValue;
        let url = location.href;
        let parameters = (url.slice(url.indexOf("?") + 1, url.length)).split("&");
        for(let i = 0; i < parameters.length; i++) {
            let varName = parameters[i].split("=")[0];
            if(varName.toUpperCase() == param.toUpperCase()) {
                returnValue = parameters[i].split("=")[1];
                return decodeURIComponent(returnValue);
            }
        }
    }
</script>
<body>
<h3>${exampleName} : ${exampleTitle}</h3>
<table>
    <tbody>
    </tbody>
    <tr>
        <th>제목</th>
        <td>${exampleTitle}</td>
    </tr>
    <tr>
        <th>이름</th>
        <td>${exampleName}(${exampleId})</td>
    </tr>
    <tr>
        <th>개봉일</th>
        <td>${exampleDate}</td>
    </tr>
    <tr>
        <th>내용</th>
        <td>${exampleInfo}</td>
    </tr>
    </tbody>
    <tfoot>
    <tr>
        <td colspan="2">
            <button id="btnList" type="button">리스트</button>
            <button id="btnRemove" type="button">글삭제</button>
            <button id="btnRevise" type="button">글수정</button>
        </td>
    </tr>
    </tfoot>
</table>
</body>
</html>
③ exampleWrite.jsp - 게시글 작성
src₩main₩webapp₩WEB-INF₩views 경로에 JSP 파일을 추가한다.

File name 입력창에 exampleWrite.jsp 라고 입력한다.

Finish 버튼을 클릭하여 exampleWrite.jsp 파일을 생성한다.
exampleWrite.jsp 파일이 생성되면 아래 코드의 내용을 추가한다.

exampleWrite.jsp
<%@ page contentType="text/html;charset=UTF-8" language="java"%>
<html>
<head>
  <title>${exampleTitle}</title>
</head>
<style type="text/css">
  table, thead, tbody, tfoot { border:1px solid #000000;border-collapse:collapse; }
  tfoot { text-align:right; }
  th, td { border:1px solid #000000;padding:10px; }
</style>
<script src="http://code.jquery.com/jquery-1.12.4.js"></script>
<script type="text/javascript">
  document.addEventListener("DOMContentLoaded", function() {
    document.getElementById("btnVerification").addEventListener("click", function() {
      duplicateCheckId();
    });

    document.getElementById("btnList").addEventListener("click", function() {
      history.back();
    });

    document.getElementById("btnRegistry").addEventListener("click", function() {
      submitRegistryExample();
    });
  });

  function duplicateCheckId() {

    if(document.getElementsByName("exampleId")[0].value.replace(/\s/gi, "") == "") {
      alert("ID를 입력하지 않았습니다.\nID를 입력해 주세요.");
      document.getElementsByName("exampleId")[0].focus();
      return false;
    }

    jQuery.ajax({
      url : "./verificationDuplicateId.do"
      , type : "POST"
      , data : {
        "exampleId" : document.getElementsByName("exampleId")[0].value
      }
      , success:function(json) {
        if(json.result == "success") {
          alert(json.message);
          document.getElementsByName("exampleName")[0].focus();
          document.getElementById("verificationId").value = "true";
        } else {
          alert(json.message);
          document.getElementsByName("exampleId")[0].value = "";
          document.getElementsByName("exampleId")[0].focus();
        }
      }
    });
  }

  function submitRegistryExample() {

    if(document.getElementById("verificationId").value == "false") {
      alert("ID 중복체크를 진행하지 않았습니다.\nID를 중복체크해 주세요.");
      document.getElementById("btnVerification").focus();
      return false;
    }

    if(document.getElementsByName("exampleName")[0].value.replace(/\s/gi, "") == "") {
      alert("이름을 입력하지 않았습니다.\n이름을 입력해 주세요.");
      document.getElementsByName("exampleName")[0].focus();
      return false;
    }

    if(document.getElementsByName("exampleTitle")[0].value.replace(/\s/gi, "") == "") {
      alert("제목을 입력하지 않았습니다.\n제목을 입력해 주세요.");
      document.getElementsByName("exampleTitle")[0].focus();
      return false;
    }

    if(document.getElementsByName("exampleDate")[0].value.replace(/\s/gi, "") == "") {
      alert("날짜를 입력하지 않았습니다.\n날짜를 입력해 주세요.");
      document.getElementsByName("exampleDate")[0].focus();
      return false;
    }

    document.getElementById("formWriteExample").method = "POST";
    document.getElementById("formWriteExample").action = "./exampleRegistryWrite.do";
    document.getElementById("formWriteExample").submit();
  }
</script>
<body>
<h3>신규 글 등록</h3>
<input type="hidden" id="verificationId" value="false"/>
<form id="formWriteExample">
  <table>
    <tbody>
    <tr>
      <th>ID</th>
      <td>
        <input type="text" name="exampleId" value=""/>
        <button id="btnVerification" type="button">중복확인</button>
      </td>
    </tr>
    <tr>
      <th>이름</th>
      <td>
        <input type="text" name="exampleName" value=""/>
      </td>
    </tr>
    <tr>
      <th>제목</th>
      <td>
        <input type="text" name="exampleTitle" value=""/>
      </td>
    </tr>
    <tr>
      <th>날짜</th>
      <td>
        <input type="date" name="exampleDate" value=""/>
      </td>
    </tr>
    <tr>
      <th>내용</th>
      <td><textarea name="exampleInfo"></textarea></td>
    </tr>
    </tbody>
    <tfoot>
    <tr>
      <td colspan="2">
        <button id="btnList" type="button">리스트</button>
        <button id="btnRegistry" type="button">글등록</button>
      </td>
    </tr>
    </tfoot>
  </table>
</form>
</body>
</html>
④ exampleRevise.jsp - 게시글 수정
src₩main₩webapp₩WEB-INF₩views 경로에 JSP 파일을 추가한다.

File name 입력창에 exampleRevise.jsp 라고 입력한다.

Finish 버튼을 클릭하여 exampleRevise.jsp 파일을 생성한다.
exampleRevise.jsp 파일이 생성되면 아래 코드의 내용을 추가한다.
exampleRevise.jsp
<%@ page contentType="text/html;charset=UTF-8" language="java"%>
<html>
<head>
    <title>${exampleTitle}</title>
</head>
<style type="text/css">
    table, thead, tbody, tfoot { border:1px solid #000000;border-collapse:collapse; }
    tfoot { text-align:right; }
    th, td { border:1px solid #000000;padding:10px; }
    .fakeDisabled { cursor:default;background-color:#F8F8F8;color:#545454;border-color:#D6D6D6; }
</style>
<script type="text/javascript">
    document.addEventListener("DOMContentLoaded", function() {
        document.getElementById("btnModify").addEventListener("click", function() {
            submitModifyExample();
        });
    });

    function submitModifyExample() {

        if(document.getElementsByName("exampleName")[0].value.replace(/\s/gi, "") == "") {
            alert("이름을 입력하지 않았습니다.\n이름을 입력해 주세요.");
            document.getElementsByName("exampleName")[0].focus();
            return false;
        }

        if(document.getElementsByName("exampleTitle")[0].value.replace(/\s/gi, "") == "") {
            alert("제목을 입력하지 않았습니다.\n제목을 입력해 주세요.");
            document.getElementsByName("exampleTitle")[0].focus();
            return false;
        }

        if(document.getElementsByName("exampleDate")[0].value.replace(/\s/gi, "") == "") {
            alert("날짜를 입력하지 않았습니다.\n날짜를 입력해 주세요.");
            document.getElementsByName("exampleDate")[0].focus();
            return false;
        }

        document.getElementById("formWriteExample").method = "POST";
        document.getElementById("formWriteExample").action = "./exampleModifyWrite.do";
        document.getElementById("formWriteExample").submit();
    }
</script>
<body>
<h3>신규 글 등록</h3>
<input type="hidden" id="verificationId" value="false"/>
<form id="formWriteExample">
    <input type="hidden" name="exampleNumber" value="${exampleNumber}"/>
    <table>
        <tbody>
        <tr>
            <th>ID</th>
            <td>
                <input type="text" class="fakeDisabled" name="exampleId" value="${exampleId}" readonly/>
            </td>
        </tr>
        <tr>
            <th>이름</th>
            <td>
                <input type="text" name="exampleName" value="${exampleName}"/>
            </td>
        </tr>
        <tr>
            <th>제목</th>
            <td>
                <input type="text" name="exampleTitle" value="${exampleTitle}"/>
            </td>
        </tr>
        <tr>
            <th>날짜</th>
            <td>
                <input type="date" name="exampleDate" value="${exampleDate}"/>
            </td>
        </tr>
        <tr>
            <th>내용</th>
            <td><textarea name="exampleInfo">"${exampleInfo}"</textarea></td>
        </tr>
        </tbody>
        <tfoot>
        <tr>
            <td colspan="2">
                <button id="btnModify" type="button">글수정</button>
            </td>
        </tr>
        </tfoot>
    </table>
</form>
</body>
</html>
#8. Servlet 인코딩을 위한 filter, filter-mapping 설정

web.xml
<?xml version="1.0" encoding="UTF-8"?>
<web-app xmlns="http://xmlns.jcp.org/xml/ns/javaee"
         xmlns:xsi="http://www.w3.org/2001/XMLSchema-instance"
         xsi:schemaLocation="http://xmlns.jcp.org/xml/ns/javaee http://xmlns.jcp.org/xml/ns/javaee/web-app_3_1.xsd"
         version="3.1">

	~~ 이 하 생 략 ~~

    <filter>
        <filter-name>characterEncoding</filter-name>
        <filter-class>org.springframework.web.filter.CharacterEncodingFilter</filter-class>
        <init-param>
            <param-name>encoding</param-name>
            <param-value>UTF-8</param-value>
        </init-param>
    </filter>

    <filter-mapping>
        <filter-name>characterEncoding</filter-name>
        <url-pattern>*.do</url-pattern>
    </filter-mapping>

</web-app>
Filter 요소의 역할
Filter요소는 웹 어플리케이션에서 요청과 응답을 필터링 하는 역할을 한다.
Filter는 요청과 응답을 가로채서 변형하거나 필터링 할 수 있다.
따라서 Filter는 web.xml 파일에 UTF-8 설절을 적용하면 포함된 모든 문자열 데이터가 올바르게 표시된다.
( 예 : filter 이름, 클래스 이름, URL 패턴 등 )
또한, 필터가 처리하는 요청과 응답에 포함된 다국어 데이터도 올바르게 처리된다.
( 예 : HTML 페이지, JSON 응답 등 )
web.xml
<?xml version="1.0" encoding="UTF-8"?>
<web-app xmlns="http://xmlns.jcp.org/xml/ns/javaee"
         xmlns:xsi="http://www.w3.org/2001/XMLSchema-instance"
         xsi:schemaLocation="http://xmlns.jcp.org/xml/ns/javaee http://xmlns.jcp.org/xml/ns/javaee/web-app_4_0.xsd"
         version="4.0">

    <context-param>
        <param-name>contextConfigLocation</param-name>
        <param-value>classpath:spring/context-*.xml</param-value>
    </context-param>

    <listener>
        <listener-class>org.springframework.web.context.ContextLoaderListener</listener-class>
    </listener>

    <servlet>
        <servlet-name>dispatcher</servlet-name>
        <servlet-class>org.springframework.web.servlet.DispatcherServlet</servlet-class>
        <init-param>
            <param-name>contextConfigLocation</param-name>
            <param-value>/WEB-INF/dispatcher-servlet.xml</param-value>
        </init-param>
        <load-on-startup>1</load-on-startup>
    </servlet>
    <servlet-mapping>
        <servlet-name>dispatcher</servlet-name>
        <url-pattern>*.do</url-pattern>
    </servlet-mapping>

	<welcome-file-list>
        <welcome-file>index.html</welcome-file>
        <welcome-file>index.htm</welcome-file>
        <welcome-file>index.jsp</welcome-file>
        <welcome-file>default.html</welcome-file>
        <welcome-file>default.htm</welcome-file>
        <welcome-file>default.jsp</welcome-file>
    </welcome-file-list>

    <filter>
        <filter-name>characterEncoding</filter-name>
        <filter-class>org.springframework.web.filter.CharacterEncodingFilter</filter-class>
        <init-param>
            <param-name>encoding</param-name>
            <param-value>UTF-8</param-value>
        </init-param>
    </filter>

    <filter-mapping>
        <filter-name>characterEncoding</filter-name>
        <url-pattern>*.do</url-pattern>
    </filter-mapping>

</web-app>
#9. 출력결과


'Spring Web > Spring Framework' 카테고리의 다른 글
| [Spring] IntelliJ를 사용한 Spring Project 생성 및 설정(Maven) (2) | 2022.11.29 |
|---|---|
| [Spring] Android Studio GIT - Clone 기존 GIT 프로젝트와 연결 (0) | 2022.11.08 |
| [Spring] Component-Scan을 사용하는 Annotation 기반 설정 (0) | 2022.06.17 |
| [Spring] Spring MVC 패턴(Model2 아키텍쳐) 구현 하기 (0) | 2022.05.26 |
| [Spring] Spring Framework 웹 프로젝트 만들기 (0) | 2021.12.23 |