![[Android] FCM 메시지 송수신 Application 제작](https://img1.daumcdn.net/thumb/R750x0/?scode=mtistory2&fname=https%3A%2F%2Fblog.kakaocdn.net%2Fdna%2FWiwvh%2FbtrXURYOjLV%2FAAAAAAAAAAAAAAAAAAAAAI8V0JhZl2BcBwBuD15f0fSU5-TTj28xW_2SZ4QkCAWc%2Fimg.jpg%3Fcredential%3DyqXZFxpELC7KVnFOS48ylbz2pIh7yKj8%26expires%3D1772290799%26allow_ip%3D%26allow_referer%3D%26signature%3DXcOU6%252Fj5fsRYRpGrbiel8%252BnxVHg%253D)
참고문서#01. FCM푸시 파헤치기 : https://zuminternet.github.io/FCM-PUSH/
참고문서#02. 관리자 서비스 키 생성 : https://developers.fingerpush.com/app-push/sdk-manual/android
1. FireBase 프로젝트 생성
인터넷 브라우저를 통해 FireBase Console( https://console.firebase.google.com ) 에 접속한다.

FireBase Console 사이트에 접속하고 [ + 프로젝트 만들기 ] 버튼을 클릭하여준다.
먼저 [ 프로젝트 이름 ]을 지정하여 준다.

[ 프로젝트 이름 ]을 지정하고 [ 계속 ] 버튼을 클릭한다.
[ 이 프로젝트에서 Google 애널리틱스 사용 설정 ]을 활성화 한다.( 선택 )

[ 계속 ] 버튼을 클릭한다.
Google Analytics 계정이 존재하지 않는다면 계정을 생성하고 계속 진행 한다.
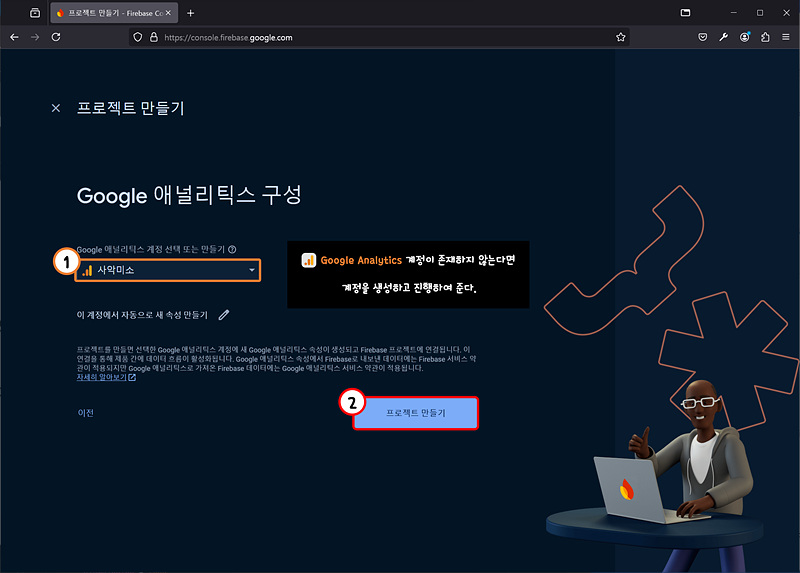
[ 프로젝트 만들기 ] 버튼을 클릭한다.
이제 프로젝트가 준비되었다.

[ 계속 ] 버튼을 클릭한다.
[ 프로젝트 개요 ] 항목에 새로 생성한 FireBase 프로젝트가 나타난다.

[ Android ] 버튼을 클릭한다.
Android App에 FireBase 추가 내용을 작성한다.
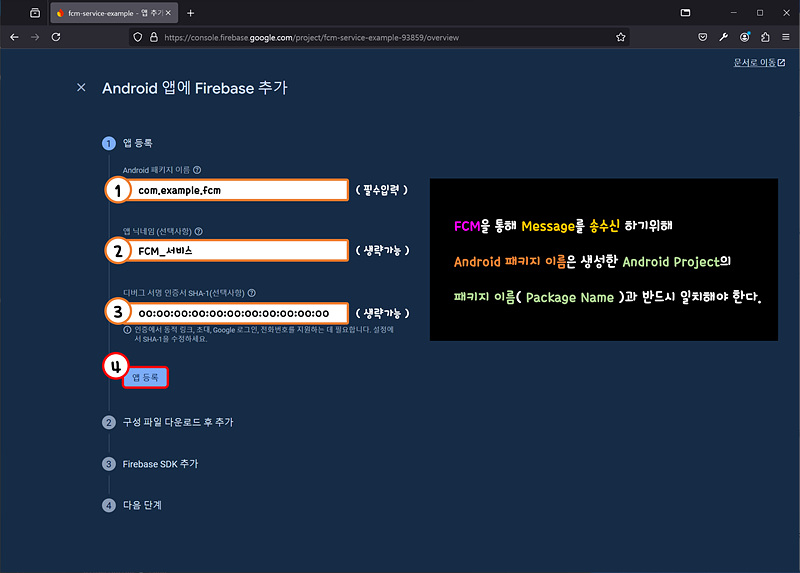
| Android 패키지 이름 | com.example.fcm | 필수 |
| 앱 닉네임 | FCM 서비스 명칭 기재 | 선택( 구분을 위해 작성 권장 ) |
| 디버그 서명 인증서 SHA-1 | 생략 가능 | 선택( 생략 ) |
※ Android 패키지 이름은 Android Poject의 패키지 이름과 동일해야 한다.
작성이 완료 하였다면 [ 앱 등록 ] 버튼을 클릭한다.
[ google-services.json ] 파일을 다운로드 받는다.
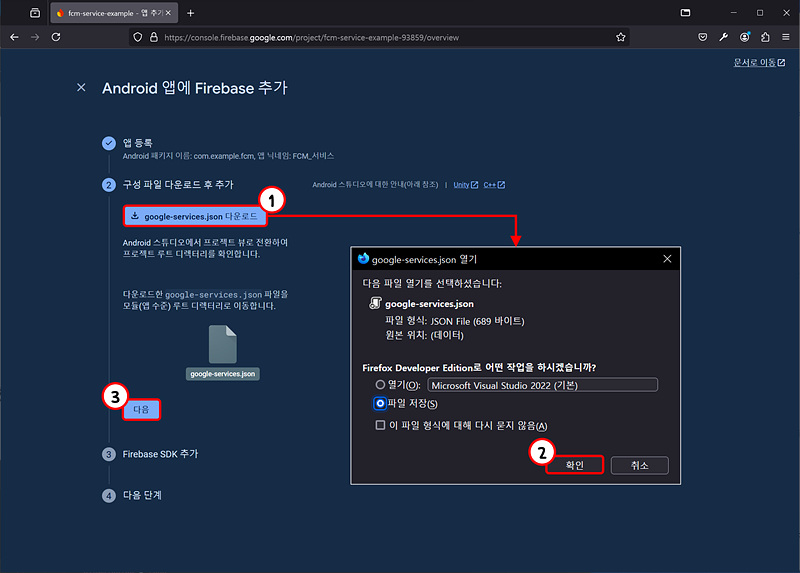
google-services.json 파일
Firebase에서 발급받은 google-services.json 파일은 Android Application과 FireBase 프로젝트를 연결하는 데 필요한 구성 파일이다.
이 파일에는 FireBase 서비스가 앱을 식별하고 인증하는 데 필요한 고유 정보와 설정 정보가 포함되어 있다.
[ 다음 ] 버튼을 클릭한다.
FireBase SDK 추가에서 [ Grovy( build.gradle ) ]을 선택하여 준다.

Android Project의 [ build.gradel( Project, Moudel ) ] 파일에 대하여 추가할 플러그인에 대하여 설명한다.
해당 포스팅은 Android Project를 생성하고 위 내용을 추가하여 주었다.
[ 다음 ] 버튼을 클릭하여 준다.
'Android App에 FireBase 추가' 설정이 완료되었다면 [ 콘솔로 이동 ] 버튼을 클릭한다.

FireBase 프로젝트 개요로 돌아오면 위에서 생성한 [ FireBase App 닉네임 ]이 노출된다.

2. Android Project 생성 및 사용자 디바이스 Token 발급
FCM을 통해 메시지를 전달받기 위해 Android Studio를 실행하고 프로젝트를 하나 생성한다.
[ New Project ] 팝업창에서 [ Phone and Tablet] → [ Empty Views Actitivty ]를 선택한다.

[ Next ] 버튼을 클릭한다.
신규 프로젝트 생성을 위해 [ Empty Views Actitivty ]의 속성정의한다.

| Name | FireBaseExample |
| Pakce name | com.example.fcm |
| Save location | Android 프로젝트 생성 경로 |
| Language | Java |
| Minium SDK | API 24 ( "Nougat" : Android 7.0 ) |
| Build conifguration language | Grooby DSL( build.gradle ) |
프로젝트 LEVEL [ build.gradle ] 파일을 선택하고 Google Services 플러그인을 사용하기 위한 설정을 추가하여 준다.

build.gradle( 프로젝트 Level )
plugins {
	alias(libs.plugins.android.application) apply false
	id "com.google.gms.google-services" version "4.4.2" apply false
}
이 플러그인은 FireBase아 같은 Google 서비스와의 통합을 위해 필요하다.
다음으로 build.gradle( 모듈 Level )을 선택하고 FireBase를 사용하기위한 의존성을 주입하여 준다.

build.gradle( 모듈 Level )
plugins {
    alias(libs.plugins.android.application)
    id "com.google.gms.google-services" // Google Services 플러그인 적용
}

android {
    namespace "com.example.fcm"
    compileSdk 34

    defaultConfig {
        applicationId "com.example.fcm"
        minSdk 24
        targetSdk 34
        versionCode 1
        versionName "1.0"

        testInstrumentationRunner "androidx.test.runner.AndroidJUnitRunner"
    }

    buildTypes {
        release {
            minifyEnabled false
            proguardFiles getDefaultProguardFile("proguard-android-optimize.txt"), "proguard-rules.pro"
        }
    }

    compileOptions {
        sourceCompatibility JavaVersion.VERSION_17
        targetCompatibility JavaVersion.VERSION_17
    }

    // 뷰 바인딩
    buildFeatures {
        viewBinding = true
    }
}

dependencies {

    implementation "androidx.appcompat:appcompat:1.7.0"
    implementation "com.google.android.material:material:1.12.0"
    implementation "androidx.activity:activity:1.9.2"
    implementation "androidx.constraintlayout:constraintlayout:2.1.4"

    // FireBase 라이브러리 의존성 주입
    implementation platform('com.google.firebase:firebase-bom:33.4.0')
    implementation "com.google.firebase:firebase-analytics:22.1.2"
    implementation "com.google.firebase:firebase-messaging:24.0.2"

    testImplementation "junit:junit:4.13.2"

    androidTestImplementation libs.ext.junit
    androidTestImplementation libs.espresso.core
}

// Google Services 플러그인 적용
apply plugin : "com.google.gms.google-services"
FireBase 라이브러리 의존성 주입 코드를 추가하였다면
Android Studio 상단 메뉴에서 [ Build ] → [ Make Project ] 를 선택하여 Gradle을 Build 하여 준다.

※ Build가 마무리된 이후 다음 작업을 진행한다.
Android Project의 Package 경로를 추가하여 준다.

[ activity ] 패키지를 추가하여 준다.
MainActivity.java 파일을 생성한 [ activity ] 패키지 내부로 이동시킨다

이후 아래와 같이 MainActivity.java 파일을 수정하여 준다.

MainActivity.java
package com.example.fcm.activity;

import android.os.Bundle;
import android.util.Log;
import android.view.View;

import androidx.annotation.NonNull;
import androidx.appcompat.app.AppCompatActivity;

import com.example.fcm.databinding.ActivityMainBinding;

import com.google.android.gms.tasks.OnCompleteListener;
import com.google.android.gms.tasks.Task;
import com.google.firebase.messaging.FirebaseMessaging;

public class MainActivity extends AppCompatActivity {

    private static final String TAG = "MainActivity";
    private ActivityMainBinding binding; // 뷰 바인딩 객체

    @Override
    protected void onCreate(Bundle savedInstanceState) {

        super.onCreate(savedInstanceState);

        // 뷰 바인딩 객체 초기화
        binding = ActivityMainBinding.inflate(getLayoutInflater());
        setContentView(binding.getRoot());

        // 버튼 클릭 리스너 설정
        binding.buttonGetToken.setOnClickListener(new View.OnClickListener() {

            @Override
            public void onClick(View v) {

                // FCM 토큰 요청
                FirebaseMessaging.getInstance().getToken()
                    .addOnCompleteListener(new OnCompleteListener<String>() {
                        @Override
                        public void onComplete(@NonNull Task<String> task) {
                            if (!task.isSuccessful()) {
                                Log.w(TAG, "FCM 토큰 가져오기 실패", task.getException());
                                return;
                            }

                            // 새 FCM 등록 토큰 가져오기
                            String token = task.getResult();
                            Log.d(TAG, "FCM 토큰 : " + token);

                            // 토큰을 화면에 표시
                            binding.textViewToken.setText("FCM Token : " + token);
                            binding.textViewToken.setVisibility(View.VISIBLE); // 토글로 TextView 표시
                        }
                    });
            }
        });
    }
}
다음으로 [ AndroidManifest.xml ] 파일을 수정되어 있는지 확인한다.

AndroidManifest.xml
<?xml version="1.0" encoding="utf-8"?>
<manifest xmlns:android="http://schemas.android.com/apk/res/android"
    xmlns:tools="http://schemas.android.com/tools">

    <application
        android:allowBackup="true"
        android:dataExtractionRules="@xml/data_extraction_rules"
        android:fullBackupContent="@xml/backup_rules"
        android:icon="@mipmap/ic_launcher"
        android:label="@string/app_name"
        android:roundIcon="@mipmap/ic_launcher_round"
        android:supportsRtl="true"
        android:theme="@style/Theme.FireBaseExample"
        tools:targetApi="31">
        <activity
            android:name=".activity.MainActivity"
            android:exported="true">
            <intent-filter>
                <action android:name="android.intent.action.MAIN" />

                <category android:name="android.intent.category.LAUNCHER" />
            </intent-filter>
        </activity>
    </application>

</manifest>
MainActivity 앞에 생성한 패키지명인 activity를 추가하여져 있어야 한다.
activity_main.xml 파일을 열고 <Button>과 <TextView>를 추가하여준다.

activity_main.xml
<?xml version="1.0" encoding="utf-8"?>
<androidx.constraintlayout.widget.ConstraintLayout xmlns:android="http://schemas.android.com/apk/res/android"
    xmlns:app="http://schemas.android.com/apk/res-auto"
    xmlns:tools="http://schemas.android.com/tools"
    android:id="@+id/main"
    android:layout_width="match_parent"
    android:layout_height="match_parent"
    tools:context=".activity.MainActivity">

    <Button
        android:id="@+id/button_get_token"
        android:layout_width="wrap_content"
        android:layout_height="wrap_content"
        android:text="Get FCM Token"
        app:layout_constraintTop_toTopOf="parent"
        app:layout_constraintStart_toStartOf="parent"
        app:layout_constraintEnd_toEndOf="parent"
        app:layout_constraintBottom_toBottomOf="parent"/>

    <TextView
        android:id="@+id/textView_token"
        android:layout_width="wrap_content"
        android:layout_height="wrap_content"
        android:text="FCM Token will appear here"
        android:visibility="gone"
        app:layout_constraintTop_toBottomOf="@+id/button_get_token"
        app:layout_constraintStart_toStartOf="parent"
        app:layout_constraintEnd_toEndOf="parent"
        android:padding="16dp"/>

</androidx.constraintlayout.widget.ConstraintLayout>
다운받은 google-services.json 파일을 생성한 Android Project의 /app 디렉토리에 위치시킨다.

다시 Andorid Project로 돌아와서 좌측 상단에서 [ Android ] → [ Project ]를 선택하여 준다.

Project로 변경되면 app 디렉토리 내부에 google-services.json 파일이 위치하는 것을 알 수 있다.

다시 Andorid Project를 상단에서 [ Project ] → [ Android ]로 변경하여 준다.

이제 상단의 [ ▷ App 빌드 ] 버튼을 클릭하여 Android Project를 실행한다.

Android 디바이스에서 생성한 App이 실행되면 아래와 같을 것이다.

[ Get FCM Token ] 버튼을 클릭하여 사용자 Token을 생성하여 준다.
Android Studio의 [ Log Cat ] 창을 오픈하고 찾아보면 FCM 토큰이 Log로 찍히는 것을 확인할 수 있다.
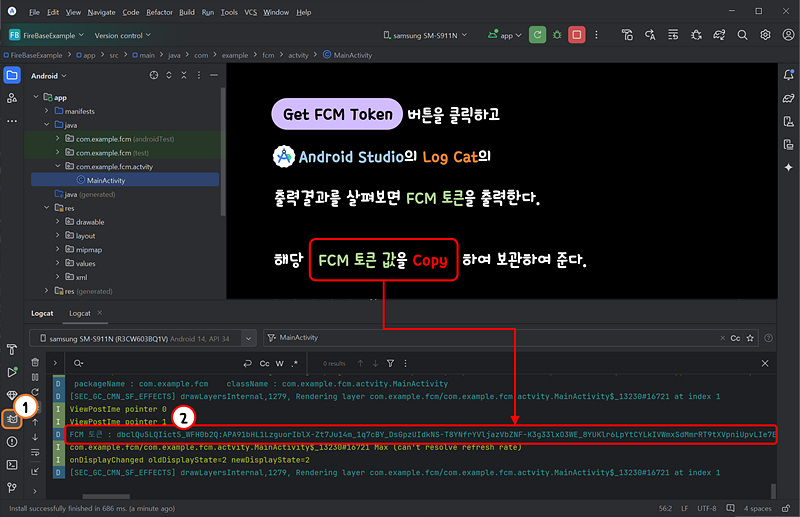
Log 창에 출력되는 사용자 FCM Token 값을 복사하여 보관하여 준다.
4. 비공개 키를 사용한 Access Token 발급
FireBase [ 프로젝트 개요 ]를 클릭하고 [ 프로젝트 설정 ]을 선택하여 준다.

상단 프로젝트 설정 메뉴에서 [ 서비스 계정 ]을 선택하고 [ JAVA ]를 선택 하여 준다.

[ 새 비공개 키 생성] 버튼을 클릭한다.
새 비공개 키 생성 팝업창이 오픈 되면 [ 키 생성 ] 버튼을 클릭한다.

[ FireBase_Admin_SDK_서비스_계정_키.json ] 파일을 다운로드 한다.
다시 프로젝트 설정 메뉴에서 [ 클라우드 메시징 ] 메뉴를 선택한다.
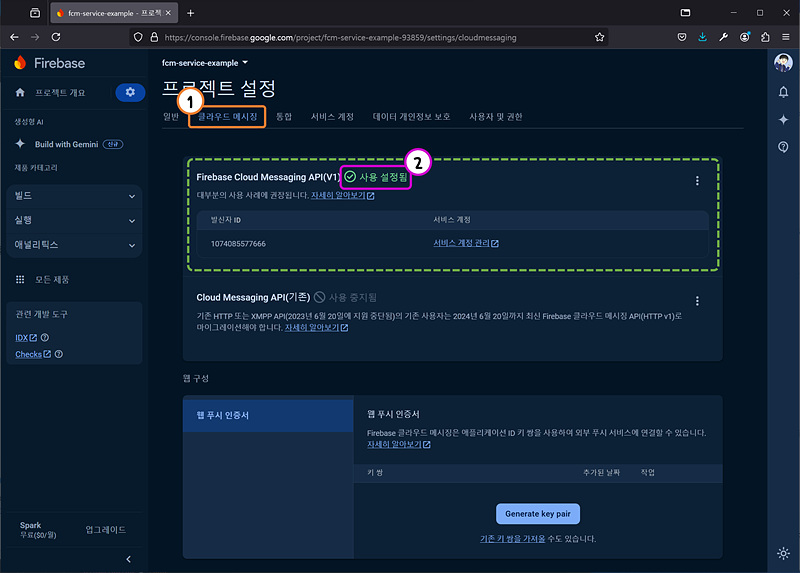
[ ☑ 사용 설정됨 ] 이라고 표기되어 있으면 된다.
InteeliJ IDE를 실행하고 아래와 같이 새로운 Java 프로젝트를 생성하여 준다.

| Name | FireBaseOAuthToken |
| Location | 프로젝트 생성 경로 지정 |
| Build System | Gradle |
| JDK | JAVA JDK-17 |
| Gradle DSL | Groovy |
| Add sample Code | 체크 |
| Gradle distribution | Wrapper |
| Gradle Version | Auto-select 체크 |
| GroupId | com.example.fcm |
| ArtifactId | FireBaseOAuthToken |
위와 같이 입력하고 [ Create ] 버튼을 클릭하여 Java 프로젝트를 생성하여 준다.
[ build.gradle ] 파일을 열고 google-auth-library-oauth2-http 플러그인을 추가하여 준다.

build.gradle
plugins {
    id "java"
}

group = "com.example.fcm"
version = "1.0-SNAPSHOT"

repositories {
    mavenCentral()
}

dependencies {

    implementation "com.google.auth:google-auth-library-oauth2-http:1.29.0"

    testImplementation platform("org.junit:junit-bom:5.10.0")
    testImplementation "org.junit.jupiter:junit-jupiter"
}

test {
    useJUnitPlatform()
}
내용을 추가하였다면 Gradle을 다시 [ Build ] 하여 준다.
이후 다운받은 [ Firebase_Admin_SDK_서비스_계정_키.json ] 파일을 Java 프로젝트의 [ /resources ] 경로에 위치시켜 준다.

다음으로 IntelliJ IDE 상단 메뉴에서 [ File ] → [ Settings ] 메뉴를 선택하여 준다.

Settings 팝업창이 오픈되면 좌측 메뉴에서 [ File Encodings ] 설정을 찾고 문자셋을 UTF-8로 변경하여준다.

설정을 다 변경하였다면 [ Apply ] 버튼을 클릭하여 변경사항을 저장하고 [ OK ] 버튼을 클릭하여 창을 닫는다.
이제 Access Token을 발급받을 [ OAuthTokenGenerator.java ] 클래스 파일을 생성하여 준다.

[ OAuthTokenGenerator.java ] 클래스 파일이 생성되면 아래와 같이 내용을 추가하여 준다.

OAuthTokenGenerator.java
package com.example.fcm;

import com.google.auth.oauth2.GoogleCredentials;
import com.google.auth.oauth2.AccessToken;
import com.google.auth.oauth2.ServiceAccountCredentials;

import java.io.IOException;
import java.io.InputStream;
import java.util.Collections;

public class OAuthTokenGenerator {

    public static void main(String[] args) {

        try {

            // 서비스 계정 키(리소스 경로에 있는 JSON 파일을 읽음)
            InputStream keyFileStream = OAuthTokenGenerator.class
                .getClassLoader()
                .getResourceAsStream("Firebase_Admin_SDK_서비스_계정_키.json");

            if(keyFileStream == null) {
                throw new IOException("리소스 파일을 찾을 수 없습니다.");
            }

            // 필요한 OAuth 2.0 범위
            String scope = "https://www.googleapis.com/auth/cloud-platform";

            // 서비스 계정 자격 증명 생성
            GoogleCredentials credentials = ServiceAccountCredentials
                .fromStream(keyFileStream)
                .createScoped(Collections.singleton(scope));

            // 액세스 토큰 새로고침
            credentials.refreshIfExpired();
            AccessToken token = credentials.getAccessToken();

            // 액세스 토큰 출력
            System.out.println("Access Token : " + token.getTokenValue());

        } catch (IOException e) {
            e.printStackTrace();
        }
    }
}
코드를 다 작성하였다면 [ ▷ Build ] 버튼을 클릭하여 준다.

FCM Message를 송신할 때 필요한 Access Token이 생성된다.
해당 Access Token의 값을 복사하여 준다.
4. Android App에서 Notification 수신 설정
이제 FCM으로 전송되는 Message를 Android App에서 수신할 수 있도록 설정을 추가해 줄 것이다.
다시 Android Studio를 열고 [ service ] 패키지 경로를 추가하여 준다.

생성된 [ service ] 패키지 경로를 선택하고 새로운 Java 클래스 파일을 추가하여 준다.

[ service ] 패키지 경로에 [ MyFirebaseMessageingService.java ] 클래스 파일을 생성하여 준다.
[ MyFirebaseMessagingService.java ] 클래스 파일의 코드는 아래와 같다.

MyFirebaseMessagingService.java
package com.example.fcm.service;

import android.app.NotificationChannel;
import android.app.NotificationManager;
import android.content.Context;
import android.os.Build;
import android.util.Log;

import androidx.core.app.NotificationCompat;

import com.example.fcm.R;
import com.google.firebase.messaging.FirebaseMessagingService;
import com.google.firebase.messaging.RemoteMessage;

public class MyFirebaseMessagingService extends FirebaseMessagingService {

    private static final String TAG = "FCMService";
    private static final String CHANNEL_ID = "fcm_channel";	// 사용자 지정 채널ID

    @Override
    public void onMessageReceived(RemoteMessage remoteMessage) {

        Log.d(TAG, "From : " + remoteMessage.getFrom());

        // 메시지에 알림이 포함된 경우
        if(remoteMessage.getNotification() != null) {

            Log.d(TAG, "Message Notification Title : " + remoteMessage.getNotification().getTitle());
            Log.d(TAG, "Message Notification Body : " + remoteMessage.getNotification().getBody());

            // 알림 전송
            sendNotification(remoteMessage.getNotification().getTitle(), remoteMessage.getNotification().getBody());
        }
    }

    private void sendNotification(String title, String messageBody) {

        // Android 8.0 이상에서는 NotificationChannel 필요
        NotificationManager notificationManager = (NotificationManager) getSystemService(Context.NOTIFICATION_SERVICE);

        if(Build.VERSION.SDK_INT >= Build.VERSION_CODES.O) {
            NotificationChannel channel = new NotificationChannel(
                  CHANNEL_ID
                , "Default Channel"
                , NotificationManager.IMPORTANCE_DEFAULT
            );
            channel.setDescription("Channel for default notifications");
            notificationManager.createNotificationChannel(channel);
        }

        NotificationCompat.Builder notificationBuilder = new NotificationCompat.Builder(this, CHANNEL_ID)
            .setSmallIcon(R.drawable.baseline_notifications_active_24)  // 알림 아이콘 설정
            .setContentTitle(title)                                     // 알림 제목
            .setContentText(messageBody)                                // 알림 내용
            .setPriority(NotificationCompat.PRIORITY_DEFAULT)           // 우선순위 설정
            .setAutoCancel(true);                                       // 알림 클릭 시 자동으로 닫힘

        notificationManager.notify(0, notificationBuilder.build());  // 알림 표시
    }

    @Override
    public void onNewToken(String token) {

        Log.d(TAG, "Refreshed token : " + token);
    }
}
이제 FCM을 통해 알림이 오면 노출시킬 '알림 아이콘' 이미지를 생성한다.

[ drawable ] 메뉴를 선택하고 우클릭 하여 [ New ] → [ Vector Asset ]을 선택한다.
Asset Studo 창이 오픈되면 [ Clip art ] 항목을 클릭한다.

Select Icon 창이 오픈되면 검색창에서 [ notification ] 을 검색하여 준다.

[ notification active ]를 선택하고 [ OK ] 버튼을 클릭한다.
다시 Asset Studio 창으로 돌아오면 [ Clip art ]가 선택한 이미지로 변경되어 있는 것을 확인 할 수 있다.

[ Next ] 버튼을 클릭하여 준다.
[ Finish ] 버튼을 클릭하여 Vector 이미지를 생성하여 준다.

그럼 [ drawable ] 디렉토리에 아래와 같이 Vector 이미지가 추가된 것을 확인 할 수 있다.

다음으로 [ AndroidManifest.xml ] 파일의 내용을 수정하여 준다.

AndroidManifest.xml
<?xml version="1.0" encoding="utf-8"?>
<manifest xmlns:android="http://schemas.android.com/apk/res/android"
    xmlns:tools="http://schemas.android.com/tools">

    <!--알림 권한 설정 -->
    <uses-permission android:name="android.permission.POST_NOTIFICATIONS" />

    <application
        android:allowBackup="true"
        android:dataExtractionRules="@xml/data_extraction_rules"
        android:fullBackupContent="@xml/backup_rules"
        android:icon="@mipmap/ic_launcher"
        android:label="@string/app_name"
        android:roundIcon="@mipmap/ic_launcher_round"
        android:supportsRtl="true"
        android:theme="@style/Theme.FireBaseExample"
        tools:targetApi="31">

        <!-- 기본 알림 아이콘 설정 -->
        <meta-data
            android:name="com.google.firebase.messaging.default_notification_icon"
            android:resource="@drawable/baseline_notifications_active_24">
        </meta-data>

        <activity
            android:name=".activity.MainActivity"
            android:exported="true">
            <intent-filter>
                <action android:name="android.intent.action.MAIN"/>
                <category android:name="android.intent.category.LAUNCHER"/>
            </intent-filter>

            <!-- 알림 클릭 시 실행될 액션 -->
            <intent-filter>
                <action android:name="OPEN_ACTIVITY"/>
                <category android:name="android.intent.category.DEFAULT"/>
            </intent-filter>
        </activity>

        <!-- Firebase 메시징 이벤트를 처리하는 서비스 컴포넌트를 선언 -->
        <service
            android:name=".service.MyFirebaseMessagingService"
            android:exported="true">
            <intent-filter>
                <action android:name="com.google.firebase.MESSAGING_EVENT"/>
            </intent-filter>
        </service>

    </application>

</manifest>
알림 권한을 설정하고 Vector 이미지 설정을 추가하여 주었다.
이제 [ MainActivity.java ] 클래스 파일을 수정하여 App 실행시 알림 권한을 허용하도록 설정한다.

MainActivity.java
package com.example.fcm.activity;

import android.Manifest;
import android.content.pm.PackageManager;
import android.os.Build;
import android.os.Bundle;
import android.util.Log;
import android.view.View;
import android.widget.Toast;

import androidx.annotation.NonNull;
import androidx.appcompat.app.AppCompatActivity;
import androidx.core.app.ActivityCompat;
import androidx.core.content.ContextCompat;

import com.example.fcm.databinding.ActivityMainBinding;

import com.google.android.gms.tasks.OnCompleteListener;
import com.google.android.gms.tasks.Task;
import com.google.firebase.messaging.FirebaseMessaging;

public class MainActivity extends AppCompatActivity {

    private static final String TAG = "MainActivity";
    private ActivityMainBinding binding; // 뷰 바인딩 객체

    // 권한 요청을 구분하기 위한 상수 선언
    private static final int REQUEST_NOTIFICATION_PERMISSION = 1001;  // 고유한 숫자로 설정

    @Override
    protected void onCreate(Bundle savedInstanceState) {

        super.onCreate(savedInstanceState);

        // 뷰 바인딩 객체 초기화
        binding = ActivityMainBinding.inflate(getLayoutInflater());
        setContentView(binding.getRoot());

        // "topic"라는 주제에 구독
        FirebaseMessaging.getInstance().subscribeToTopic("topic").addOnCompleteListener(new OnCompleteListener<Void>() {

            @Override
            public void onComplete(@NonNull Task<Void> task) {

                if(task.isSuccessful()) {
                    Log.d("FCM", "주제('topic')을 성공적으로 구독");
                } else {
                    Log.d("FCM", "주제('topic') 구독에 실패하였습니다.");
                }
            }
        });

        // Android 알림 권한 요청
        if(Build.VERSION.SDK_INT >= Build.VERSION_CODES.TIRAMISU) {

            if(ContextCompat.checkSelfPermission(this, Manifest.permission.POST_NOTIFICATIONS) != PackageManager.PERMISSION_GRANTED) {

                ActivityCompat.requestPermissions(this, new String[]{ Manifest.permission.POST_NOTIFICATIONS }, REQUEST_NOTIFICATION_PERMISSION);
            }
        }

        // 버튼 클릭 리스너 설정
        binding.buttonGetToken.setOnClickListener(new View.OnClickListener() {

            @Override
            public void onClick(View view) {

                // FCM 토큰 요청
                FirebaseMessaging.getInstance().getToken()
                    .addOnCompleteListener(new OnCompleteListener<String>() {

                        @Override
                        public void onComplete(@NonNull Task<String> task) {
                            if (!task.isSuccessful()) {
                                Log.w(TAG, "FCM 토큰 가져오기 실패", task.getException());
                                return;
                            }

                            // 새 FCM 등록 토큰 가져오기
                            String token = task.getResult();
                            Log.d(TAG, "FCM 토큰: " + token);

                            // 토큰을 화면에 표시
                            binding.textViewToken.setText("FCM Token: " + token);
                            binding.textViewToken.setVisibility(View.VISIBLE); // 토글로 TextView 표시
                        }
                    });
            }
        });
    }

    // 권한 요청 결과 처리
    @Override
    public void onRequestPermissionsResult(int requestCode, @NonNull String[] permissions, @NonNull int[] grantResults) {

        super.onRequestPermissionsResult(requestCode, permissions, grantResults);

        if(requestCode == REQUEST_NOTIFICATION_PERMISSION) {

            if(grantResults.length > 0 && grantResults[0] == PackageManager.PERMISSION_GRANTED) {
                Toast.makeText(this, "알림 권한이 허용 되었습니다.", Toast.LENGTH_SHORT).show();
            }

            else {
                Toast.makeText(this, "알림 권한이 거부 되었습니다.\n알림을 받을 수 없습니다.", Toast.LENGTH_SHORT).show();
            }
        }
    }
}
코드 변경이 마무리 되었다면 다시 Android Project를 디바이스에 빌드 하여 준다.

디바이스에 생성한 App이 실행되면 아래 순서대로 작업을 진행하여 준다.

Application이 실행되면 반드시 [ 허용 ] 버튼을 클릭여 "알림 권한 설정"을 활성화 해주어야 한다.
5. FCM을 이용한 Message 송수신 테스트
생성한 FCM 프로젝트와, Android App이 메시지를 정상적으로 수신하는지 확인하기 위하여 테스트를 진행해 보자.
FCM을 통해 보낸 메시지를 Android App이 수신하는지 확인하기 위해서 FCM 서버에 메시지를 송신한다.

FCM에 메시지를 송신하기위해 PostMan을 사용하였다.
1) 단일 기기를 타게팅 하여 Message 전송
앞에서 FCM 관리자 서비스 계정 키.json 파일을 이용한 [ Access Token ] 과 사용자의 [ Device Token ] 을 생성하였다.
여기서 생성한 [ Access Token ], [ Device Token ]을 사용할 것이다.

| XHR | POST |
| URL | https://fcm.googleapis.com/v1/projects/fcm-service-example-93859/messages:send |
와 같이 선택 및 입력하고 [ Headers ]를 선택한다.
| Key | Value |
| Content-Type | application/json;charset=UTF-8; |
| Authorization | Bearer 액세스_토큰 |
위와같이 Key, Value 값을 추가하여 준다.
다음으로 [ Body ] 항목을 선택하고 [ raw ]를 체크하여 준다.

REST
{
	"message" : {
		"notification" : {
			"title" : "테스트 메시지"
		  , "body" : "PostMan에서 보낸 테스트 메시지"
		}
		, "data" : {
			"key1" : "value1"
		  , "key2" : "value2"
		}
		, "token" : "안드로이드_디바이스_토큰"
		, "android" : {
			"notification" : {
				"channel_id" : "fcm_channel"   // App에서 설정한 채널 ID와 일치해야 함
			}
		}
	}
}
입력 필드에 위와 같이 입력하고 [ Send ] 버튼을 클릭하여 준다.

Message가 FCM 서버로 송신되었다면 Response 결과는 아래와 같을 것이다.
이제 Android 디바이스를 확인해 보자 FCM을 통해 메시지가 수신되었는지 확인해 보자.

2) Topic을 이용한 그룹 메시지 전송
1:N 전송을 위한 방법중에 주제를 구독한 사용자들에게만 Message를 전송하는 방법이 존재한다.
FCM 주제 메시징을 사용하면 구독 모델을 기반으로 특정 주제를 구독하는 여러 기기에 메시지를 보낼 수 있다.
이번에는 Android App에서 topic_group 이라는 주제를 구독하게 하고 Mesaage 송수신을 테스트 해보겠다.
[ MainActivity.java ] 파일을 열고 App 실행시 자동으로 Topic을 구독하도록 설정한다.

MainActivity.java
package com.example.fcm.activity;

import android.Manifest;
import android.content.pm.PackageManager;
import android.os.Build;
import android.os.Bundle;
import android.util.Log;
import android.view.View;
import android.widget.Toast;

import androidx.annotation.NonNull;
import androidx.appcompat.app.AppCompatActivity;
import androidx.core.app.ActivityCompat;
import androidx.core.content.ContextCompat;

import com.example.fcm.databinding.ActivityMainBinding;
import com.google.android.gms.tasks.OnCompleteListener;
import com.google.android.gms.tasks.Task;
import com.google.firebase.messaging.FirebaseMessaging;

public class MainActivity extends AppCompatActivity {

    private static final String TAG = "MainActivity";
    private ActivityMainBinding binding; // 뷰 바인딩 객체

    // 권한 요청을 구분하기 위한 상수 선언
    private static final int REQUEST_NOTIFICATION_PERMISSION = 1001;  // 고유한 숫자로 설정

    @Override
    protected void onCreate(Bundle savedInstanceState) {

        super.onCreate(savedInstanceState);

        // 뷰 바인딩 객체 초기화
        binding = ActivityMainBinding.inflate(getLayoutInflater());
        setContentView(binding.getRoot());

        // "topic"라는 주제에 구독
        FirebaseMessaging.getInstance().subscribeToTopic("topic_group")
            .addOnCompleteListener(new OnCompleteListener<Void>() {

            @Override
            public void onComplete(@NonNull Task<Void> task) {

                if(task.isSuccessful()) {
                    Log.d("FCM", "주제('topic')을 성공적으로 구독");
                } else {
                    Log.d("FCM", "주제('topic') 구독에 실패하였습니다.");
                }
            }
        });

        // Android 알림 권한 요청
        if(Build.VERSION.SDK_INT >= Build.VERSION_CODES.TIRAMISU) {

            if(ContextCompat.checkSelfPermission(this, Manifest.permission.POST_NOTIFICATIONS) != PackageManager.PERMISSION_GRANTED) {

                ActivityCompat.requestPermissions(this, new String[]{Manifest.permission.POST_NOTIFICATIONS}, REQUEST_NOTIFICATION_PERMISSION);
            }
        }

        // 버튼 클릭 리스너 설정
        binding.buttonGetToken.setOnClickListener(new View.OnClickListener() {

            @Override
            public void onClick(View view) {

                // FCM 토큰 요청
                FirebaseMessaging.getInstance().getToken()
                    .addOnCompleteListener(new OnCompleteListener<String>() {

                        @Override
                        public void onComplete(@NonNull Task<String> task) {
                            if (!task.isSuccessful()) {
                                Log.w(TAG, "FCM 토큰 가져오기 실패", task.getException());
                                return;
                            }

                            // 새 FCM 등록 토큰 가져오기
                            String token = task.getResult();
                            Log.d(TAG, "FCM 토큰 : " + token);

                            // 토큰을 화면에 표시
                            binding.textViewToken.setText("FCM Token : " + token);
                            binding.textViewToken.setVisibility(View.VISIBLE); // 토글로 TextView 표시
                        }
                    });
            }
        });
    }

    // 권한 요청 결과 처리
    @Override
    public void onRequestPermissionsResult(int requestCode, @NonNull String[] permissions, @NonNull int[] grantResults) {

        super.onRequestPermissionsResult(requestCode, permissions, grantResults);

        if(requestCode == REQUEST_NOTIFICATION_PERMISSION) {

            if(grantResults.length > 0 && grantResults[0] == PackageManager.PERMISSION_GRANTED) {
                Toast.makeText(this, "알림 권한이 허용 되었습니다.", Toast.LENGTH_SHORT).show();
            }

            else {
                Toast.makeText(this, "알림 권한이 거부 되었습니다.\n알림을 받을 수 없습니다.", Toast.LENGTH_SHORT).show();
            }
        }
    }
}
이후 다시 Android Project를 빌드하여 Device에서 App을 실행하여 준다.

이제 다시 PostMan을 통해 FCM에 Mesaage를 송신한다.
[ Headers ] 부분의 설정은 단일 Device 타게팅 설정과 동일하다.
| XHR | POST |
| URL | https://fcm.googleapis.com/v1/projects/fcm-service-example-93859/messages:send |
와 같이 선택 및 입력하고 [ Headers ]를 선택한다.
| Key | Value |
| Content-Type | application/json;charset=UTF-8; |
| Authorization | Bearer 액세스_토큰 |
다음으로 [ Body ] 항목을 선택하고 [ raw ]를 체크하여 준다.

REST
{
	"message"  : {
		"notification" : {
			 "title" : "토픽 메시지"
		   , "body" : "주제로 묶은 메시지"
		}
		, "data" : {
			  "key1" : "value1"
			, "key2" : "value2"
		}
		, "topic" : "topic_group"
		, "android" : {
			"notification" : {
				"channel_id" : "fcm_channel"   // App에서 설정한 채널 ID와 일치해야 함
			}
		}
	}
}
[ Send ] 버튼을 클릭하여 Message를 송신한다.

하단의 Response 항목에서 [ Body ]를 클릭하고 결과를 확인한다.
이전 진행한 단일 기기 타게팅 Message 수신과 마찬가지로 사용자의 디바이스에 알림창이 나타난다.

위와같이 알림이 오면 Topic( 주제 )으로 그룹지은 Message를 수신하는 것을 확인 할 수 있다.
'Android > Java Code' 카테고리의 다른 글
| [Android] Keyboard위에 Edit Text 올리기 (0) | 2023.02.06 |
|---|---|
| [Android] 출력 위치를 확인하는 Custom Log Message 제작 (0) | 2023.02.02 |
| [Android] Activity에서 Dark Theme 비활성화기 (0) | 2023.01.04 |
| [Android] 갤러리 이미지 가져오기 및 썸네일 생성 (0) | 2022.11.10 |
| [Android] 카메라 사진 가져오기 및 썸네일 생성 (0) | 2022.11.10 |