Chapter#01 : [Spring] IntelliJ를 사용한 Spring Project 생성( Gradle )
Chapter#02 : [Spring] MVC 패턴 및 MyBatis를 사용한 게시판 제작
Chapter#03 : [Spring] Log4j 설정 및 사용하기( log 파일 저장하기 )
Chapter#04 : [Spring] SpringSecurity를 이용한 사용자 인증 프로세스 구축
Chapter#05 : [Spring] JWT 토큰 발급 및 토큰 인증 받기
Chapter#06 : [Spring] Swagger 웹 서비스 RESTful API 문서 자동 생성
※ 해당 포스팅의 Apache Tomcat과 JDK는 아래 버전을 사용하였습니다.
· JDK 1.8.0_202 : https://www.oracle.com/kr/java/technologies/javase/javase8-archive-downloads.html
· Apache Tomcat 8.5.68 : https://tomcat.apache.org/download-80.cgi
1. IntelliJ - Spring 프로젝트 생성
IntelliJ IDEA의 작업 디렉토리 경로에 ExampleSpring 이라는 프로젝트 폴더를 생성하고
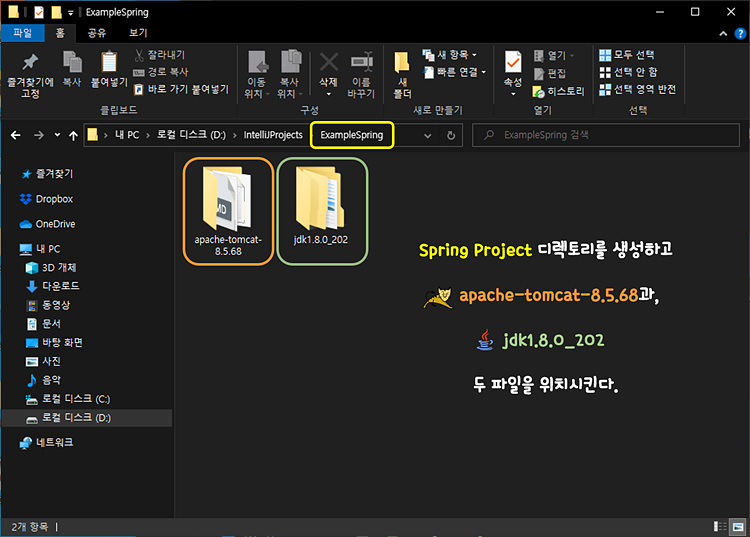
다운받은 Apache Tomcat 8.5압축을 해제하고, JDK1.8.0_202를 설치한다.
IntelliJ IDEA를 실행하고 New Project를 실행하여 신규 프로젝트를 생성한다.
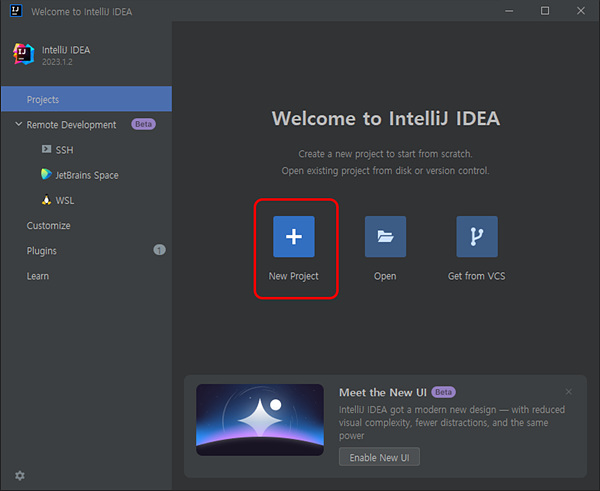
New Project 팝업창이 오픈되면 아래와 같이 내용을 기입한다.

① Name : ExampleSpring
② Location : D:\IntelliJProjects\ExampleSpirng
③ Language : Java
④ Build System : Gradle
⑤ JDK : D:\IntelliJProjects\ExampleSpirng\jdk1.8.0_20
⑥ Gradle DSL : Groovy
⑦ GroupId : org.example
⑧ ArtifactId : ExampleSpring
※ 해당 포스팅의 프로젝트 이름은 `ExampleSpring`을 사용하였다.
프로젝트 이름( Name )과 작업 경로( Location )는 생성한 로컬 프로젝트의 디렉토리명과 경로를 지정하고
해당 경로에 설치한 JDK를 세팅하여 준다.
그럼 아래와 같이 신규 프로젝트가 생성된다.

프로젝트에 필요한 라이블러리와 모듈 등의 설치가 모두 완료될때가지 기다린다.
( 설치가 완료되기 전에 작업을 진행하면 정상적으로 진행되지 않을 수도 있다. )
프로젝트의 생성이 완료되면 먼저 [build.gradle] 파일을 열고 내용을 아래와 같이 수정하여 준다.

build.gradle
plugins {
    id "java"
    id "war"
}

apply plugin : "war"

group "org.example"
version "0.0.1-SNAPSHOT"

sourceCompatibility = 1.8

repositories {
    mavenCentral()
}

dependencies {
    testImplementation "org.junit.jupiter:junit-jupiter-api:5.8.1"
    testRuntimeOnly "org.junit.jupiter:junit-jupiter-engine:5.8.1"

    // Servelt API
    providedCompile "javax.servlet:servlet-api:2.5"

    // SpringFramework
    implementation "org.springframework:spring-aop:5.2.22.RELEASE"
    implementation "org.springframework:spring-beans:5.2.22.RELEASE"
    implementation "org.springframework:spring-context:5.2.22.RELEASE"
    implementation "org.springframework:spring-core:5.2.22.RELEASE"
    implementation "org.springframework:spring-expression:5.2.22.RELEASE"
    implementation "org.springframework:spring-jcl:5.2.22.RELEASE"
    implementation "org.springframework:spring-tx:5.2.22.RELEASE"
    implementation "org.springframework:spring-web:5.2.22.RELEASE"
    implementation "org.springframework:spring-webmvc:5.2.22.RELEASE"
    implementation "org.springframework:spring-jdbc:5.2.22.RELEASE"
}

test {
    useJUnitPlatform()
}
내용을 수정하였다면 build.gradle을 [Rebuild] 하여 준다.

[Rebuild] 함으로서 dependencies에 적용한 라이브러리들을 사용할 수 있게된다.
2. Spring Framework 웹 어플리케이션 구성하기
1) Java Web Application의 기본설정 ( web.xml )
web.xml은 Java 웹 어플리케이션의 기본 설정을 담당하는 파일이다
이 파일은 서블릿 컨테이너에 의해 읽히며, 어플리케이션의 전반적인 구성 및 설정을 관리한다.
· 서블릿 매핑 : URL과 서블릿 클래스 간의 매핑을 설정하여 클라이언트 요청을 처리할 서블릿을 결정한다.
· 리스너 설정 : Web 어플리케이션 이벤트를 수신하고 처리하는 리스너를 등록할 수 있다.
· 필터 설정 : 요청 및 응답에 대한 전/후 처리 작업을 수행하는 필터를 등록할 수 있다.
· 세션 설정 : 세션 관리 및 세션 타임아웃을 설정할 수 있다.
웹 서버의 요청을 받는 Spring 설정 파일인 web.xml 파일을 생성한다.
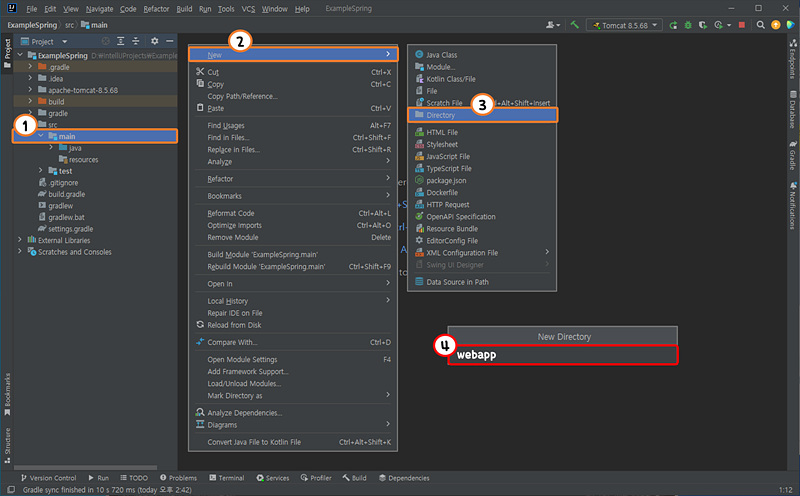
먼저 src/main 경로에 webapp 이라는 디렉토리를 하나 생성한다.
생성한 webapp 디렉토리 아래에 다시 WEB-INF 라는 디렉토리를 하나더 생성한다.
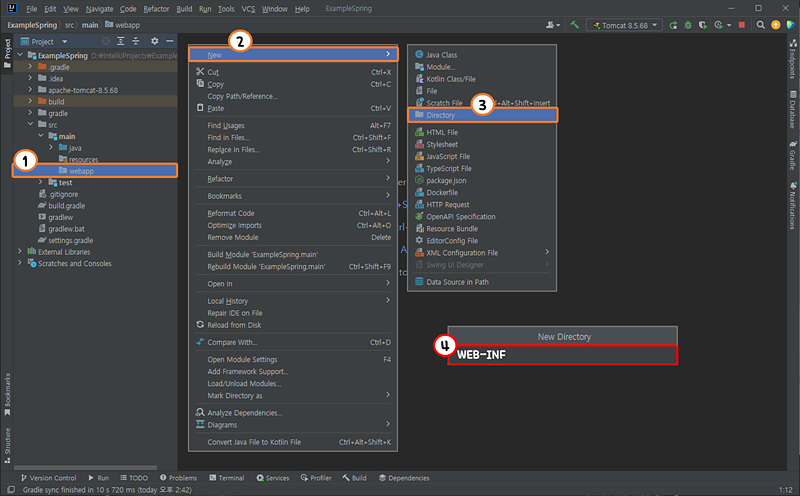
WEB-INF 디렉토리가 생성되면 해당 디렉토리를 선택하고 xml 파일을 생성한다.

New File 팝업창이 오픈되면 web.xml이라고 입력하여 web.xml 파일을 생성한다.
web.xml 파일을 열고 ContextLoaderListener를 등록하고, Spring의 ApplicationContext를 생성하는 설정을 기입한다.

web.xml
<?xml version="1.0" encoding="UTF-8"?>
<web-app xmlns="http://xmlns.jcp.org/xml/ns/javaee"
         xmlns:xsi="http://www.w3.org/2001/XMLSchema-instance"
         xsi:schemaLocation="http://xmlns.jcp.org/xml/ns/javaee http://xmlns.jcp.org/xml/ns/javaee/web-app_3_1.xsd"
         version="3.1">

    <context-param>
        <param-name>contextConfigLocation</param-name>
        <param-value>classpath:context/context-*.xml</param-value>
    </context-param>

    <listener>
        <listener-class>org.springframework.web.context.ContextLoaderListener</listener-class>
    </listener>

    <servlet>
        <servlet-name>dispatcher</servlet-name>
        <servlet-class>org.springframework.web.servlet.DispatcherServlet</servlet-class>
        <init-param>
            <param-name>contextConfigLocation</param-name>
            <param-value>/WEB-INF/dispatcher-servlet.xml</param-value>
        </init-param>
        <load-on-startup>1</load-on-startup>
    </servlet>

    <servlet-mapping>
        <servlet-name>dispatcher</servlet-name>
        <url-pattern>*.do</url-pattern>
        <url-pattern>/</url-pattern>
    </servlet-mapping>

    <welcome-file-list>
        <welcome-file>index.html</welcome-file>
        <welcome-file>index.htm</welcome-file>
        <welcome-file>index.jsp</welcome-file>
        <welcome-file>default.html</welcome-file>
        <welcome-file>default.htm</welcome-file>
        <welcome-file>default.jsp</welcome-file>
    </welcome-file-list>

    <filter>
        <filter-name>characterEncoding</filter-name>
        <filter-class>org.springframework.web.filter.CharacterEncodingFilter</filter-class>
        <init-param>
            <param-name>encoding</param-name>
            <param-value>UTF-8</param-value>
        </init-param>
    </filter>

    <filter-mapping>
        <filter-name>characterEncoding</filter-name>
        <url-pattern>*.do</url-pattern>
    </filter-mapping>

</web-app>
2) Spring 어플리케이션의 컨텍스트 설정( applicationContext.xml, context-common.xml )
applicationContext.xml 또는 context-common.xml은 Spring 애플리케이션의 주요 컨텍스트 설정 파일이다.
※ 해당 포스팅은 context-common.xml을 사용한다.
이 파일은 어플리케이션 전반에 걸쳐 사용되는 빈( Bean ) 정의 및 의존성 주입을 설정하는 데 사용한다.
· 빈 정의 : 어플리케이션에서 사용될 빈 객체를 정의하고 구성합니다. 이 객체들은 Spring 컨테이너에 의해 생성되고 관리된다.
· 의존성 주입 : 빈들 간의 의존성을 주입하여 객체 간에 협력 관계를 형성한다.
· AOP 설정 : 관점 지향 프로그래밍( Aspect-Oriented Programming ) 설정을 통해 애플리케이션의 부가 기능을 구현한다.
· 프로퍼티 설정: 어플리케이션 전반적으로 사용되는 환경 설정 값을 지정한다.
src/main/resources 디렉토리를 선택하고 context라는 디렉토리를 하나 추가한다.

context 디렉토리가 생성되었다면 context 디렉토리를 선택하고 context-common.xml 파일을 생성한다.
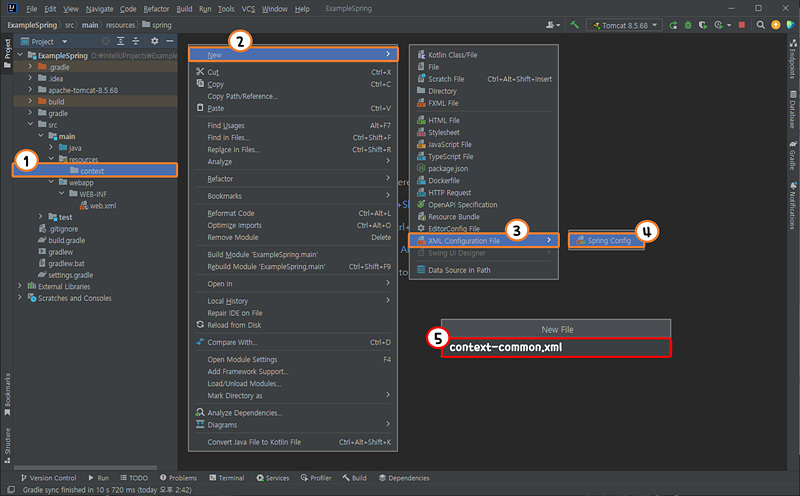
context-common.xml 파일이 생성되었다면 아래 코드의 내용을 추가하여 준다.

context-common.xml
<?xml version="1.0" encoding="UTF-8"?>
<beans xmlns="http://www.springframework.org/schema/beans"
       xmlns:xsi="http://www.w3.org/2001/XMLSchema-instance"
       xmlns:context="http://www.springframework.org/schema/context"
       xsi:schemaLocation="
		http://www.springframework.org/schema/beans
		http://www.springframework.org/schema/beans/spring-beans.xsd
		http://www.springframework.org/schema/context
		http://www.springframework.org/schema/context/spring-context-4.2.xsd
">

    <!-- @Service, @Repository만 include -->
    <context:component-scan base-package="org.example.*.*" use-default-filters="true">
        <!-- Controller는 자동 스캔에 포함시키지 않는다. -->
        <context:exclude-filter type="annotation" expression="org.springframework.stereotype.Controller"/>
    </context:component-scan>

</beans>
3) Spring MVC 웹 어플리케이션 설정( dispatcher-servlet.xml )
dispatcher-servlet.xml은 Spring MVC 웹 애플리케이션에서 사용되는 설정 파일이다.
Spring MVC는 웹 애플리케이션을 개발하기 위한 프레임워크로, 요청과 응답 처리를 위한 컨트롤러 및 뷰를 관리한다.
dispatcher-servlet.xml은 주로 다음과 같은 작업을 수행한다.
· 컨트롤러 매핑 : URL과 컨트롤러 클래스를 매핑하여 요청을 처리할 컨트롤러를 결정합니다.
· 뷰 리졸버 설정 : 컨트롤러의 처리 결과를 어떤 뷰에 보여줄지 결정하는 뷰 리졸버를 설정합니다.
· 인터셉터 설정 : 요청의 전/후에 추가적인 작업을 수행하는 인터셉터를 등록할 수 있습니다.
위에서 생성한 WEB-INF 디렉토리를 선택하고 dispatcher-servlet.xml 파일을 생성한다.

dispatcher-servlet.xml 파일이 생성되었다면 아래 코드의 내용을 추가하여 준다.

dispatcher-servlet.xml
<?xml version="1.0" encoding="UTF-8"?>
<beans xmlns="http://www.springframework.org/schema/beans"
       xmlns:xsi="http://www.w3.org/2001/XMLSchema-instance"
       xmlns:mvc="http://www.springframework.org/schema/mvc"
       xmlns:context="http://www.springframework.org/schema/context"
       xsi:schemaLocation="http://www.springframework.org/schema/beans http://www.springframework.org/schema/beans/spring-beans.xsd http://www.springframework.org/schema/mvc https://www.springframework.org/schema/mvc/spring-mvc.xsd http://www.springframework.org/schema/context https://www.springframework.org/schema/context/spring-context.xsd">

    <mvc:annotation-driven></mvc:annotation-driven>

    <!-- static 정적 자원( css, js, img ) -->
    <mvc:resources location="classpath:/static/" mapping="/static/**"></mvc:resources>

    <context:component-scan base-package="org.example.*.controller" use-default-filters="true">

        <!-- Controller는 자동 스캔에 포함 시킨다. -->
        <context:include-filter type="annotation" expression="org.springframework.stereotype.Controller"></context:include-filter>

        <!-- Service, Repository는 자동 스캔에 제외 시킨다. -->
        <context:exclude-filter type="annotation" expression="org.springframework.stereotype.Service"></context:exclude-filter>
        <context:exclude-filter type="annotation" expression="org.springframework.stereotype.Repository"></context:exclude-filter>

    </context:component-scan>

    <bean class="org.springframework.web.servlet.view.InternalResourceViewResolver">
        <property name="prefix" value="/WEB-INF/views/"></property>
        <property name="suffix" value=".jsp"></property>
        <property name="order" value="1"/>
    </bean>

</beans>
3. Spring MVC - 컨트롤러( Controller )
컨트롤러는 MVC (Model-View-Controller) 패턴에서 "Controller" 역할을 담당하는 구성 요소이다.
컨트롤러는 사용자의 입력을 처리하고, 이를 기반으로 모델 업데이트 및 관련 뷰를 선택하여 업데이트하는 역할을 수행하게 된다.
Spring Framework에서는 Spring MVC를 통해 웹 애플리케이션의 컨트롤러를 개발하고 관리할 수 있다.
※ Spring MVC 컨트롤러의 특징 및 역할
① 사용자 입력 처리
클라이언트로부터 온 HTTP 요청을 해석하고, 요청 파라미터, 경로 변수, 세션 등의 데이터를 활용하여 애플리케이션의 로직에 맞게 처리합니다.
② 모델 조작
컨트롤러는 비즈니스 로직을 처리하거나 모델을 업데이트하기 위해 서비스, DAO 등의 빈을 호출합니다. 모델의 데이터를 조작하여 상태를 변경하거나 검색 등의 작업을 수행합니다.
③ 뷰 선택 및 전달
처리 결과에 따라 어떤 뷰를 보여줄지를 결정하고, 해당 뷰에 데이터를 전달합니다. 컨트롤러는 뷰 이름을 반환하며, 이 뷰 이름은 뷰 리졸버에 의해 실제 뷰로 매핑됩니다.
④ 인터셉터 적용
요청 전, 후에 추가 작업을 수행하기 위해 인터셉터를 등록할 수 있습니다. 예를 들어, 로그인 상태 체크, 인증, 권한 확인 등을 수행할 수 있습니다.
Spring Framework에서 Spring MVC 컨트롤러를 개발하는 방법은 여러 가지가 있다.
주요한 방법 중 하나는 @Controller 어노테이션을 사용하여 클래스를 컨트롤러로 지정하는 것이다.
또한 컨트롤러 메서드는 @RequestMapping 어노테이션을 사용하여 특정 URL 경로와 HTTP 메서드에 매핑하게 된다.
컨트롤러 메서드는 요청을 처리하고 모델을 수정하며, 적절한 뷰 이름을 반환하여 뷰를 선택하게 된다.
src/main/java 디렉토리의 org.example 패키지를 선택하고 board 라는 패키지 경로를 추가한다.

board 패키지 경로가 추가되었다면 이번엔 controller 라는 패키지를 하나 추가한다.

org.example.board.controller 패키지가 생성되었다면 이제 BoardController.java 클래스파일을 생성한다.

BoardController.java 클래스 파일이 생성되었다면 아래 코드의 내용을 추가하여 준다.
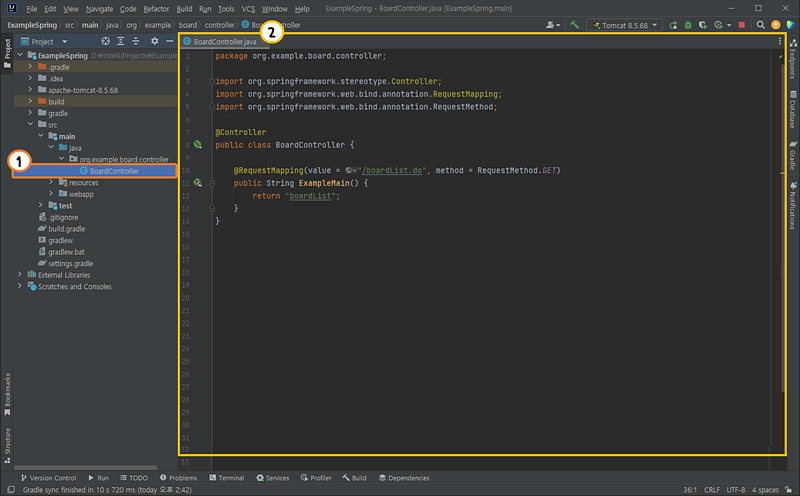
BoardController.java
package org.example.board.controller;

import org.springframework.stereotype.Controller;
import org.springframework.web.bind.annotation.RequestMapping;
import org.springframework.web.bind.annotation.RequestMethod;

@Controller
public class BoardController {

    @RequestMapping(value = "/boardList.do", method = RequestMethod.GET)
    public String ExampleMain() {
        return "boardList";
    }
}
위 예시에서 @Controller 어노테이션으로 클래스를 컨트롤러로 지정하고,
@RequestMapping 어노테이션으로 메서드를 특정 URL 경로에 매핑하고 있다.
메서드 내부에서 모델을 조작하고, 뷰 이름을 반환하여 해당 뷰로 데이터를 전달하게 된다.
3. Spring MVC - 뷰 ( View )
뷰는 MVC(Model-View-Controller) 패턴에서 "View"는 사용자에게 정보를 표시하고 시각적으로 보여주는 역할을 담당하는 구성 요소이다.
뷰는 모델의 데이터를 사용하여 사용자 인터페이스를 생성하고 렌더링하는 역할을 한다.
Spring MVC 프레임워크에서도 뷰는 중요한 역할을 하며, 사용자에게 웹 페이지나 화면을 제공하는데 사용하게 된다.
※ Spring MVC에서 뷰는 다음과 같은 주요 역할
① 사용자 인터페이스 표시
뷰는 클라이언트의 요청에 따라 모델에서 가져온 데이터를 기반으로 웹 페이지나 화면을 생성하고 표시하고, 사용자에게 정보를 보여주는 역할을 수행한다.
② 데이터 바인딩
뷰는 모델에서 가져온 데이터를 뷰 템플릿의 특정 위치에 바인딩하게 된다.
이는 사용자가 데이터를 시각적으로 확인할 수 있도록 하는 역할을 한다.
③ 템플릿 엔진 사용
Spring MVC에서는 다양한 템플릿 엔진 (예: Thymeleaf, JSP, FreeMarker)을 지원한다.
각 템플릿 엔진은 뷰를 생성하는데 사용되며, 뷰 템플릿에서 모델 데이터를 동적으로 삽입하여 완성된 뷰를 생성한다.
④ 뷰 리졸버 사용
뷰 리졸버는 뷰 이름을 실제 뷰 객체로 매핑하는 역할을 한다.
뷰 리졸버는 컨트롤러가 반환한 뷰 이름을 토대로 어떤 뷰를 사용할지 결정합니다.
Spring MVC에서 뷰는 컨트롤러에서 처리된 결과를 사용하여 생성되며, 다양한 포맷과 형식으로 제공한다.
이러한 포맷은 주로 HTML 웹 페이지, JSON 데이터, XML 데이터, PDF 등이 될 수 있습니다.
1) Web Application 접속시 가장 먼저 실행되는 index.jsp 제작
index.jsp는 일반적으로 웹 애플리케이션의 루트 디렉토리에 위치하며,
웹 애플리케이션에 접속할 때 첫 번째로 표시되는 페이지이다.
사용자가 웹 사이트 또는 애플리케이션에 처음 접속하면 index.jsp가 자동으로 로딩되어 화면에 표시된다.
src/main/webapp 디렉토리에 index.jsp 파일을 생성한다.

index.jsp 파일이 생성되면 JSP 액션 태그 `jsp:forward`를 사용하여 다른 JSP 페이지로 사용자 요청을 리디렉션 한다.

index.jsp
<%@ page language="java" contentType="text/html;charset=UTF-8" pageEncoding="UTF-8"%>
<jsp:forward page="/boardList.do"></jsp:forward>
위 `jsp:forward`를 사용하여 현재 페이지에서 `boardList.do`로 요청을 전달하게 된다.
이후 브라우저에서는 `boardList.do` 페이지의 처리가 이루어 지게 된다.
2) Sample - 게시판 리스트 페이지 제작
src/main/webapp/WEB-INF 디렉토리에 views 라는 디렉토리를 새로 생성해 준다.

views 디렉토리가 생성되면 views 디렉토리 내부에 boardList.jsp 파일을 생성한다.
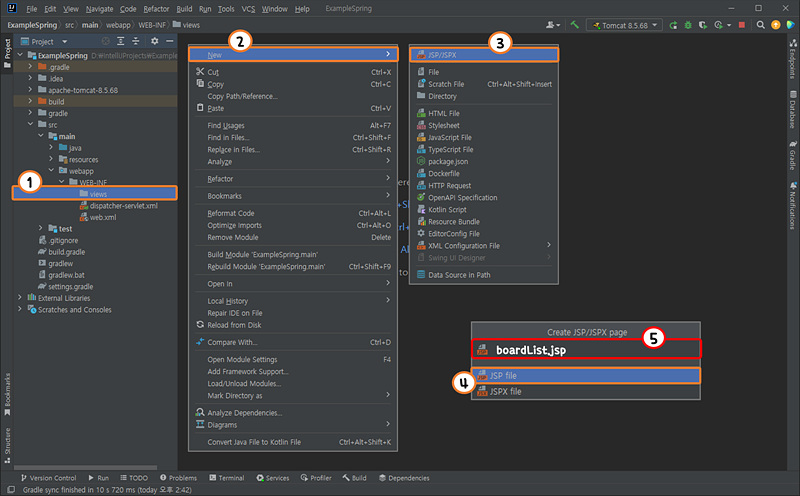
boardList.jsp 파일의 내용은 아래와 같다.

boardList.jsp
<%@ page language="java" contentType="text/html;charset=UTF-8" pageEncoding="UTF-8"%>
<!DOCTYPE html>
<html>
<head>
    <title>게시판</title>
</head>
<style>
    table, thead, tbody, tfoot { border:1px solid #000000;border-collapse:collapse; }
    tfoot { text-align:right; }
    th, td { border:1px solid #000000;padding:10px; }
    tbody > tr > td { cursor:pointer;cursor:hand; }
    tbody > tr > td:first-child { text-align:center; }
    button { cursor:pointer;cursor:hand; }
</style>
<body>
    <h1>게시판</h1>
    <table>
        <thead>
            <tr>
                <th>번호</th>
                <th>제목</th>
                <th>작성자</th>
                <th>작성일</th>
            </tr>
        </thead>
        <tbody>
            <tr>
                <td>00</td>
                <td>게시글 제목</td>
                <td>saakmiso</td>
                <td>YYYY-MM-DD</td>
            </tr>
        </tbody>
    </table>
</body>
</html>
4. Spring 프로젝트의 모듈 구성
1) Deployment Descriptor
Deployment Descriptor는 어플리케이션의 실행 환경을 설정하고 컨테이너에게 필요한 정보를 제공하는,
웹 어플리케이션의 동작을 정확하게 제어하기 위해 중요한 역할을 한다.
IntelliJ 상단 메뉴에서 File → Project Structure를 선택한다.

Project Structure 팝업창이 오픈되면 Deployment Descriptor의 [+] 버튼을 클릭하고 web.xml을 선택한다.

web.xml을 선택하면 Deployment Descriptor Location 팝업창이 오픈된다.
Spring 프로젝트의 src/main/webapp/WEB-INF 경로의 web.xml의 파일을 선택하여 준다.

web.xml 경로가 잡히면 아래 이미지와 일치할 것이다.

다시 Project Structure 팝업창에서 Modules의 상단에 [+] 버튼을 클릭하고 Spring을 선택한다.

Spring Framework 웹 어플리케이션 구성 하면서 생성한 context-common.xml, dispatcher-servlet.xml이 추가된 것을 확인 할 수 있다.

| MVC application context | context-common.xml |
| MVC dispatcher servlet context | dispatcher-servlet.xml |
2) WAS - Apache Tomcat 설정하기
WAS는 "Web Application Server(웹 어플리케이션 서버)"의 약자로서,
웹 애플리케이션을 실행하고 관리하기 위한 서버 소프트웨어를 말한다.
웹 어플리케이션 서버는 클라이언트의 웹 브라우저로부터의 요청을 받아들이고,
그에 따라 동적인 콘텐츠를 생성하거나 정적인 파일을 전송하는 역할을 수행한다.
※ 해당 포스팅에서는 Apache Tomcat 8.5 버전을 사용한다.
IntelliJ 상단 메뉴에서 Run → Edit Configurations를 선택하여 Edit Configurations 팝업창을 오픈한다.

Edit Configurations을 오픈되면 상단의 [+] 버튼을 클릭하고 Tomcat Server > Local을 선택한다.

Application Server를 Apache Tomcat으로 지정하는 작업을 진행한다.
Tocat Server 세팅창이 오픈되면 [Configure] 버튼을 클릭하여 Application Servers 팝업창이 오픈한다.

[Configure] 버튼을 클릭하여 Application Servers 팝업창이 오픈되면 좌측의 [+] 버튼을 클릭한다.
설치된 Tomcat Server의 경로를 묻은 팝업창이 오픈된다.

다운 받고 압축을 해제한 Apache Tomcat 디렉토리 경로를 지정하여준다.
Application Server에 Tomcat이 추가되었다면 OK 버튼을 클릭한다.

Application Server에 Tomcat이 추가된 것을 확인 할 수 있다.
다음으로 사용할 HTTP Port 번호를 지정해 주어야 한다.( 기본적으로 8080이 적혀 있을 것이다. )

HTTP Port를 8181로 변경하여준다.
그럼 URL 입력란의 같이 http://localhost:8181/ 로 자동적으로 변경된다.
다음으로 Tomcat Application의 문자셋 설정을 변경하여 준다.

-Duser.language=en -Duser.region=us
IntelliJ와 Tomcat을 실행할 때 사용되는 JVM의 기본 언어 및 지역 설정을 변경한다. 이 설정은 IntelliJ 또는 Tomcat 자체의 언어 설정과는 관련이 없으며, 주로 JVM에서 시스템 기본 언어와 지역을 덮어쓰는 용도로 사용된다. 따라서 이 옵션을 사용하면 IntelliJ 또는 Tomcat 인터페이스가 영어로 표시될 수 있다.
-Dfile.encoding=UTF-8
JVM에서 사용되는 파일 인코딩을 UTF-8로 설정한다. 이 옵션은 주로 텍스트 파일의 인코딩을 지정하는 용도로 사용됩니다. IntelliJ에서 소스 코드 파일의 인코딩 설정과 일치시키는 것이 중요하다.
다음으로 jre의 경로를 지정해 주어야 한다.
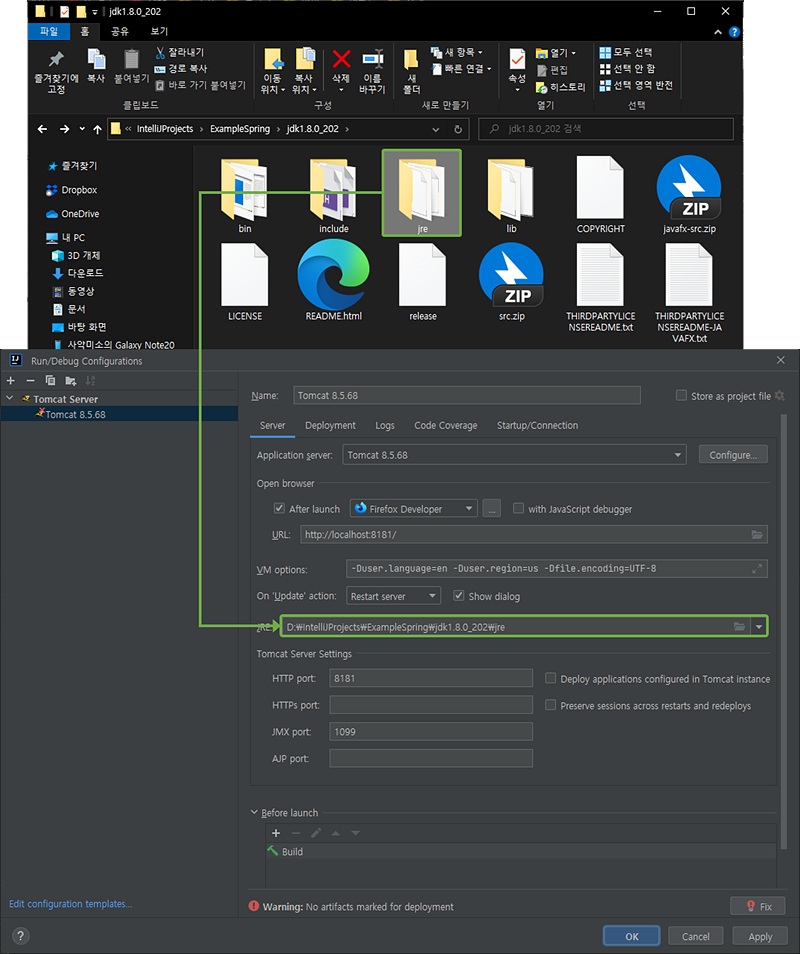
다운받은 JDK 디렉토리 안에는 jre 디렉토리가 존재할 것이다.
해당 경로의 주소를 JRE 경로에 지정하여 준다.
이제 Server쪽 설정은 마무리 하였고 Deployment 설정을 변경할 것이다.

그 전에 [Apply] 버튼을 클릭하여 Server에서 적용한 내용을 한번 저장한다.
Deployment 메뉴에서 Deploy at the server startup부분에는 [+] 버튼을 존재한다.
[+] 버튼을 클릭하면 펼쳐지는 메뉴에서 Artifact를 선택한다.

Select Artifacts to Deploy 팝업창이 오픈되면
Gradle : 프로젝트_GroupId : 프로젝트_이름-버전-SNAPSHOT.war( exploded )
( exploded )가 존재하는 항목을 선택한다.
Application Context의 값을 아래와 같이 설정한다.

| Application Context | / |
설정을 변경하였으면 [OK] 버튼을 클릭한다.
Apache Tomcat이 추가되었다면 InteillJ 상단에 Tomcat_버전 항목이 추가된것을 확인 할 수 있다.

Tomcat_버전 옆에 [▶( Run )] 버튼을 클릭하면 브라우저가 자동으로 실행되고
위와같은 화면이 출력되는것을 확인 할 수 있다.
'Spring Web > Spring Framework' 카테고리의 다른 글
| [Spring] Log4j 설정 및 사용하기(log 파일 저장하기) (0) | 2023.06.13 |
|---|---|
| [Spring] MVC 패턴 및 MyBatis 사용하는 게시판 제작 (0) | 2023.06.13 |
| [Spring] src/main/resources 경로 폴더 형태로 노출 (2) | 2023.03.30 |
| [Spring] MyBatis를 사용한 DataBase 연동 - MySQL (0) | 2022.12.09 |
| [Spring] Component-Scan을 사용하는 Annotation 기반 설정 (0) | 2022.12.09 |
![[Spring] IntelliJ를 사용한 Spring Project 생성(Gradle)](https://img1.daumcdn.net/thumb/R750x0/?scode=mtistory2&fname=https%3A%2F%2Fblog.kakaocdn.net%2Fdna%2FdjfuuP%2Fbtsm82vrKel%2FAAAAAAAAAAAAAAAAAAAAAGOow85Rd4FF8PhVnCT8Q_zTd-iE8tP327KyHRCuWABA%2Fimg.jpg%3Fcredential%3DyqXZFxpELC7KVnFOS48ylbz2pIh7yKj8%26expires%3D1772290799%26allow_ip%3D%26allow_referer%3D%26signature%3D3lD7%252Fz4fevQP9ULLAQ47ld0iwkM%253D)